Sunday, February 27, 2011

More VSN

Here are some more projects that I have made.  8 challenges left to do!

 For this one, we had to create something from a fairytale, your dream come true, blah blah blah....

 For this one, we had to create something based on something from our childhood that we loved and cherished.  I don't recall anything for myself, so I used Jack's Blue and created a little bed for him w/ fabric.  Because nowadays, that's where you'd find him!  Waiting to be snuggled at night!  For the elephant itself, I stamped him from It's a Jungle Out There by MFT, cut him out, and ran him through my xyron.  Then I sprinkled Blue Eyeshadow flocking on top.

 Clearly, you know what this challenge was?  Use sheet music.  Well, I used a stamp instead.  Love Nina Brackett's Vintage Borders set w/ the music notes!  Use it quite often!  I do have sheet music, but I like to hoard it!
Vellum challenge.  And had to emboss it.  Took the passage about Love is Patient, love is kind and printed it out in same color as Rich Razzleberry ribbon.  Embossed vellum w/ Manhattan Rose embossing folder.  Cut both paper and vellum w/ largest nesties in whatever label set this is.  I can't remember off hand and am too lazy to get up and look!  Hahaha!

For this challenge, we had to make something for coming into a kitchen, and we had to use a key.  So, I made an entry into my kitchen.  The doily there is an SVG file that I wanted to make into a decorative Victorian lock, but w/ the 45 min. time restraint, I just had the image cut like it was.  I made it into a gate fold card, so that when you open it up, it's like entering into my kitchen.

 
 And here's my kitchen!  Well, not really!  These utensils are based on my utensils in my kitchen.  I drew these over a month ago to use on another project but I kept getting a mental block every time I worked on it, so I just had these sitting on my desk, collecting dust.  Til now!  The oven mitts are handmade.  I sewed them together, and there's a little cotton in each one to make them puff up a little.

That's it for now!

Friday, February 25, 2011

VSN! WHoo hooo!!!!!!!!!!!!!

VSN has officially started!  Whooo hoooo!!!!!!!!!!!  I love VSN!  I have not been able to participate for a couple of them, but I'm participating tonight!  Well, kind of...  In between taking care of kids and doing yucky laundry!

So, here's the second VSN challenge: wedding/heart song.  My wedding song was You're the Inspiration by Chicago.  Kevin serenaded me w/ it when we were dating, and that became our wedding song when we got married!  So every time we hear it, we look at each other and just smile! :D

Anyway, so go on over to Splitcoast and see what's up!  Challenges are going on right now til 10pm, then start up again at noon tomorrow and go on all day!

See you over there, crafty peeps!

Stylish Blogger Award!

I just received this award from a fellow blogger, Kate! Thank you so much, Kate!  You have made my day!

Thursday, February 24, 2011

Many Thanks, MFT Style

I have been needing a thank you card for quite some time.  Like, since September.  And I just haven't gotten around to it. There's always something more pressing to do.  Well, I took advantage of the MFT Sketch 8 this week over on Splitcoast to make that thank you note and get it off of my to do list!

                                                    Front View
 Here's a close up of the rolled flowers and pearls and stick pin.
Inside card view.  I kept it simple so that I would have enough room to write.

To create this card:
Jumping off point: MFT Sketch 8
Paper: Ella Blue (GCD Studios); Sahara Sand (SU!)
Ink: Onyx Black
Stamps: Thanks a Bunch (MFT)
Embellishments: pleated ribbon (MFT), So Scallops Die-namics (MFT), Framed Greetings Die-namics (MFT), Rolled Rose Die-namics (MFT), flat bottomed pearls, stick pin, pearls and glass pieces (SU! Pretties Kit), popped up glue dots

Saturday, February 19, 2011

Happy Birthday Dear Friend

This week my friend Wendy celebrated her birthday, and I made a card for her!  We get together once a month (not often enough!), so I was able to hand it to her instead of mailing it.  This is also for the MFT sketch challenge this week!


Details:
Paper: Recipe card (Melissa Frances); Pretty in Pink c/s, Certainly Celery c/s
Ink: Choc. Chip, copics
Embellishments: brown sparkle chipboard, bakers twine (Making Memories), brown brads, lace, Simply Scallops die (MFT), Happy Birthday embossing folder

Friday, February 18, 2011

Mr. & Mrs.

 I have created signs for my cousin's wedding reception that will hang on the backs of their chairs!  This was totally her idea, and I ran with it!

I cut the letters out w/ my Cricut, using a downloaded font.  The swirls are also a downloaded svg. file.
The flowers are Kitchen Sink Stamps Hearts and Roses.  I used Rich Razzleberry ink pad for the rose, and Always Artichoke and Mellow Moss for the leaves.  I had sprays of pearls that I'm using for her card box, so I took a few strands and created a little focal point.  The roses are sitting on rosettes that I made that match the Rear View Mirror thank you's a few posts down from here.


Here are the two of them together.

And the details:
Paper: Cottage Wall, Rich Razzleberry (SU!)
Stamps: KSS Hearts and Roses
Ink: Rich Razzleberry, Always Artichoke, Mellow Moss
Accessories: downloaded font, downloaded svg, pearl shoots, flat edge pearl (SU!), Tim Holtz rosette

Sunday, February 13, 2011

A Valentine for my sweetheart

I have been so busy w/ wedding projects for my cousin, gift certificates for my brother's girlfriend, and just the daily exhaustive life of a stay at home mom, that I have not taken time to just play w/ my stamps and create something just for me.  Last night and this morning, I took the time to do that.  And you know what?  It reminded me of why I love this hobby in the first place!  It challenges me to be better than I was yesterday, and to keep creating outside the box and of course USE YOUR STUFF!!!  I keep buying, buying, buying, and never using!  That's one of my New Years' resolutions, to use my stuff!  I buy it because I like it, so why not use it and admire it!  LOL!

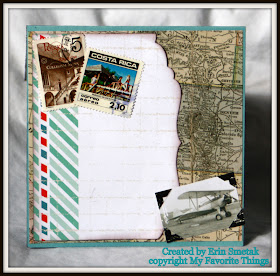
Ok, so this card is based on a sketch that My Favorite Things has drawn up.  I changed it just slightly because well, I had to.  You can see the sketch HERE.  And here's my take on the sketch:


I went vintage travel with this.  My challenge to myself is to use My Favorite Things and show them in a vintage light.  It seems to be working...?


I think I'm going to give this to my husband for Valentine's Day.  He knows how much I love maps, and there clearly is no one else in the world like him!  Thank God there's only one!  LOL!
Have a nice Valentine's Day!

Here's the details:
Stamps: MFT's Going Places and Framed Greetings
Paper: My & My Big Ideas Passport, Baja Breeze (SU!)
Accessories: MFT's Spiral Notebook die & Bracket Edge die, metal brads and clips, real postage stamps

Saturday, February 12, 2011

Rear View Mirror Thank You's

My cousin, Gina, who is getting married in a few weeks (I can't believe it's only a few weeks til the BIG DAY!!!!), and she is having me create her rear view mirror thank you's.  These thank you's will go to the valets and after the reception, when the valets bring the cars to their owners, they will slip one of these on the rear view mirror as a final token of thanks.  It says, "Thanks for sharing our special day with us!  Safe travels! Love Gina and Michael".

To create this lovely thank you, I took Rich Razzleberry c/s and ran a slim piece through my cuttlebug w/ the Tim Holtz Paper Rosette die.  Then, I created the rosette.  I punched two pieces of Rich Razzleberry w/ the 1 3/8" circle punch (SU!), and put on both sides of the rosette to hold it in place.  I let those all dry for a few days.  Ok, a week!  Now that they are properly dried and ready to go, I am now finishing the fronts.  The other wedding color is Tempting Turquoise, which I used to punch hearts from my SU! punch.  I took SU! clear heart buttons and stitched one on each heart.  I took Very Vanilla and punched out two swirls each.  Then, I created the verbiage and printed it out w/ purple ink.  I die cut each section w/ the Spellbinders Fancy Tags.  And now I am adhering all pieces to each rosette!  Fun!  For all 75!  LOL!


And since I don't have a zoom lense, you can't see a clear view of it, but you can get the jist of it!
Have a great day!

Sunday, February 6, 2011

Baja Breeze gift certificates


 I have been asked to make gift certificates for my brother's girlfriend.   She and her mother own a spa, and they asked me to create some gift certs to give out to their customers.  I was asked to make long ones that open up like a card, and short smaller ones that are one sided.  The first pic is the long one.  Clearly....!

 I used Baja Breeze, white and Kraft as my color scheme.  The stamp sets used are Toile Blossom from SU! and the bottom stamp border is Vintage Borders by Nina Brackett for Gina K. Designs.

 I incorporated the same sets and colors for the short/small version as well. 
This is a close up of the short/small version.  I cut out each hole to dress it up a little since I couldn't add any embellishments.  I only had to make 20 of these (and 20 of the long version).

Have a great week!

Friday, February 4, 2011

Wedding treats!

I am SO excited for my cousin!  She is getting married next month!!!!!  We are 1 year apart in age, and actually grew up in two different states, but we have been close since we were little!  Thanks to our moms!  She was in my wedding and now I have been asked to be in hers!  I am so happy that she has found the love of her life, and is starting this new chapter of her life with him! 
She knows that I am crafty, and has asked me to create several things for her wedding!  This blog post only features the first item.  The other items aren't quite finished yet!

The first item is a little mint pouch!  I made 50 of these for the hotel bags.  You can see all of them in the first picture here.  Her wedding colors are Tempting Turquoise and Rich Razzleberry.  She isn't a stamper, but after showing me these colors, the SU! colors matched PERFECTLY!  How divine!
I created little tags that say, "Mints for your pillow!  Sweet dreams!"  I created them using the fancy tags from Spellbinders Nestabilities, and the Large Oval punch.  It fits perfectly inside this particular die!


Other blog posts to follow as I complete each project!

Ms. Organization!

I like to be organized.  That is not always the case, but I like to TRY to be!  I am now working with my dad and two other individuals in a company that my dad has created called G.R.I.P. Solutions.  Right now I'm working with our webdesigner to build a website to display and sell the products that my dad has created.  All of these products are created/invented w/ disabled people in mind.  However, I have a few products at my home that I use, and there's nothing wrong w/ me. 

Here is our website:  www.mygripsolutions.com  It's almost complete!  We are waiting for a new banner that will take our site to a new level!  Feel free to explore the site!  I have the G.R.I.P. Pad and use it on my lap when stamping in front of the tv.  I also use the G.R.I.P. Pad in my car to hold my purse in place on the front seat when I slam the brake pedal too fast!  I also use it for long trips to hold the dvd player in for the kids in the middle console.  Once it's on there, it doesn't move!  And then I use the G.R.I.P. Pad whenever I go stamping.  Sometimes when you're working at a table that gives when you bear down on your stamp so only half of the image shows up on paper?  Well, I put my G.R.I.P. Pad down on the table, followed by my Stampin' Up! self healing mat, and then my paper and stamp, and it makes a perfect impression every time with the added support of the G.R.I.P. Pad!  The nice thing too about the G.R.I.P. Pad is that it comes in different sizes and colors!  Get yours today!  ;)

Since this is a serious product line, and we have a serious future ahead of us, I wanted to start with my best foot forward.  I try to take advantage of the opportunity to create something instead of just going out and purchasing something that I'm just ok with.  Why not create something that you are totally in love with?  I needed a binder of sorts to hold important documents, my notebooks, and any other important material needed to get my job done or have on hand if needed.  I searched my stash of office supply items and found some plastic manila folders.  I bought these by mistake several years ago for another organizing project, and just kept them, knowing that I would eventually use them for something else!  And that time had come!  I went through my SU! dsp and found Love Note that I fell in love with!!!  Grabbed some Tim Holtz stamps and other companies stamps and went to work!  Working w/ 3 colors really made it quick and easy to create this binder!  After the pages were cut and designed, I ran them through my sewing machine to create pockets.  I would advise using a strong needle for this!  On the very last pocket, I actually broke my needle because it was fighting w/ the plastic folder!  Not my most brilliant moment!  But, I'm still a novice when it comes to my sewing machine, so I'll chalk it up to, "I just didn't know!"

Here's the front:


 I used Tim Holtz and Kitchen Sink Stamps roses to create this little collage.


This is just showing the pocket.  For the rest of the pages, just the bottom is stitched and the side by the rings is stitched for reinforcement.
I used MFT stamps and dies for the top part of this page.  Nesties and inkadinkado stamps for the middle.


 Here's a close up of my MFT banner!

 Some of these are Tim Holtz and some are unknown.  I can't remember the brand of stamps that I used...

 I used Tim Holtz and Inkadinkado stamps here.  I used a martha punch and some lace behind it to anchor my centerpiece.  When I stamped the wings, I thought they were bird wings, but then I realized that I have always looked at that stamp upside down!  It's actually two baby angels holding hands!  Isn't that so sweet?!
 You can kind of see the angels better here...  But not much.  The nice thing about doing the rings to hold the files in place is that I can add to it as needed!

And this is what it usually looks like w/ all of my stuff in it!  LOL!  I feel like a real business person instead of a stay at home mom!  And THAT feels GOOD!  :D

What a wonderful friend I have!!!

I have some of the best friends in the world!  And my friend Justine is one of them!  We have a few things in common, and the rest is just entertaining!  We met on the Paper Craft Planet site a couple years ago, and became fast friends!  We share a fabulous and wonderful friend in common, Karolyn, and the three of us get along like long lost sisters!  I have actually never met either one of them in real life, but thanks to wonderful technology, we have been able to skype, and actually see in real life what the other looks like!  Hahaha!
Anyway, earlier in January, Justine had a small hospital stay, and Karolyn and I sent her flowers.  To thank me, she sent me not only a card, but a small treasure trove of embellishments for my vintage cards!
Because I'm like a kid at Christmas, I opened it all up before I thought about taking a picture of it first!  So, the picture that I have below is after I have opened it and looked at everything!  She had a really nice bow, and the one I have on here is not so nice!  But, the package itself is so pretty!  And oh my gosh, the treasures inside!  I will definitely be hoarding these lovely items forever!  Ok, I MIGHT use them! Maybe for Justine and Karolyn!


Thank you SO much Justine!!!!!!  I LOVE it all!!!!!!!  Maybe you'll see some of these things on that recipe box I promised you at Christmas!  You might get it sometime this year!  LMAO!!!!!  ;)