I completely forgot to post my wedding card and envelope that I made for my brother in law and sister in law! I meant to do that, but time got away from me!
Here is the card, using Kitchen Sink Stamps' Multi Step Wedding Couple & 3 Step Bells.
This is the envelope. I realized too late that I should have made the bouquet purple on the card, so I made it purple here on the envelope! DUH! I was taking the directions for color too literally!
Here are the links to: Multi Step Wedding Couple & 3 Step Bells
Sunday, July 15, 2012
A Special Wedding Present
Today I would like to share with you a special wedding frame that I made for my brother in law and new sister in law! The day of their wedding, in between the photographer telling them where to go and how to pose, I asked them if I could take a few pictures of them. Well, being who they are, they hammed it up for the camera, and then I got a really nice one of them!
I had the pictures developed and created this beauty that they can display in their living room!
This is the scrapbook page before going in the frame. You can see the candid shots trailing down the page. Then I highlighted the really nice one of them in the oval picture at the bottom.
Here's the page inside the frame. This is a shadowbox frame. And yes, for all you flat scrappers, I used 3-D objects on my page! Gasp!
I took different shots of the frame so you can see. I made their wedding invitations, so I included one on here. It has the date on it, so I didn't have to add that anywhere.
The flowers that you see, along w/ most of the greenery are from Kitchen Sink Stamps sets. At the bottom, I have them listed. The other greenery branches that you can see in the above picture are from a die from PTI. I sprayed them w/ Tattered Angels Olive and Route 66.
The pearls that are on each picture and the corner of the invitation are from a hardware set from Tim Holtz. I attached each w/ a circular paperclip (for lack of a better word) from my stash.
The swirls are from my stash as well. Some of them from my Swirlydoos kits that I get each month!
Ok, here are the KSS sets that I used:
Wedding Rings: 4: Onyx Black, 3: Basic Gray, 2: London Fog, 1: Platinum Planet
Ivy & Lily of the Valley: 3: Bamboo Leaves, 2: Pear Tart, 1: New Sprout, 4: Cottage Ivy
Lilies, Hydrangea, Lilac, Rose, Zinnia: 3: Sweet Plum, 2: Perfect Plum, 1: Lulu Lavender, 4: (& sometimes 5:) Elegant Eggplant
Wednesday, July 4, 2012
Thanks Berry Much!
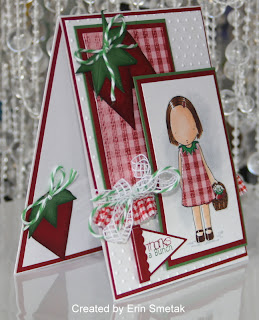
Hi! Today I created a card for someone special and was able to participate in the MFT Sketch Challenge this week! I love a twofer!
To create the strawberries, I die cut Cherry Cobbler w/ MFT's Berry Box Die-namics, and the stem in Garden Green. I took one side of the box, and cut it to make an individual strawberry. I rounded the top of the strawberry so that it looked more realistic. I cut the stem in half (looks like a star) and adhered to both strawberries on the front. I added a twine bow to finish it off. Oh, and I sponged around the edges to give dimension. I did the same thing for the strawberry inside.
Have a wonderful day!


