Thursday, January 31, 2008
Challenge 1-29-08 & 1-30-08
Monday, January 28, 2008
Monday Challenge - Dahlia fold
Wow, this Dahlia fold was pretty cool! When I saw what could be done with it, I HAD to do this challenge! Like I wasn't going to anyway! LOL! I have to do EVERY challenge! As they say on Splitcoast, you could call me a "Challenge Chaser"! Anyway, today's challenge was to make a card using this Dahlia fold, directions found here. The first card I thought was great, until I saw the others that were posted after mine. I was blown away by some of these cards! They were absolutely beautiful! One card had 7 pages of comments, it was that pretty. Actually, here's the link to that card. This girl had 118 comments on this ONE card! It is gorgeous! You have to look at it!
So, here are my cards. So, the first one I did was ok ~ it looks like a snowflake everyone keeps telling me! And it does!!!! How funny! And then I did the second one, and I like it even more than the first one! I like how it's dreamy looking. Like, looking at a garden after it has rained and it's a little foggy. Anyway, I would love to hear what you think about them. But, only if you haven't commented on Splitcoast! No need to comment twice!!!
This is number 1.
Recipe:
Stamps: words from Stem Silhouettes
Paper: K & Co., white c.s.
Ink: Elegant Eggplant
Accessories: rhinestone brad, ribbon, scallop punch
This is number 2:
Recipe:
Stamps: Priceless
Paper: Thomas Kincaid from FOREVER AGO!, vellum, Mellow Moss
Ink: Always Artichoke (shading)
Accessories: wire "S" for antennae, rhinestone brad, pearls
Happy Stamping!!!
Friday, January 25, 2008
Friday Challenge
Today's challenge is Limited Supply. So, we had to use our scraps and make a card out of it. Well, I guess I cleaned a little too early, because my desk was spotless when I came in to work! See....But, what you can't see, and what I WON'T take a picture of is the rest of my room! Hahaha! I have so much stuff in here, PartyLite stuff, the kids games, the pack & play with stuff in it, and a bunch of stamp sets strewn all over the floor!
So, when I read the challenge, I thought, Hmmmmm, what the heck am I going to do? I have all of my scraps filed away by color. That was my re-organizing when my dad closed his office. I got one of his filing cabinets and I color coded and separated all of my Stampin' Up paper. All other paper I threw away and the 12x12 went into my paper taker and two paper holder bags (for lack of better words! You can seen them above. Clear with black straps, there's cotton balls on the one!) It's rather funny, because I'm SO into organization with my stamping stuff, but for the rest of the house, I'm not so worried about it!
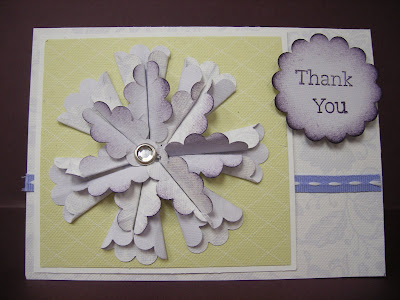
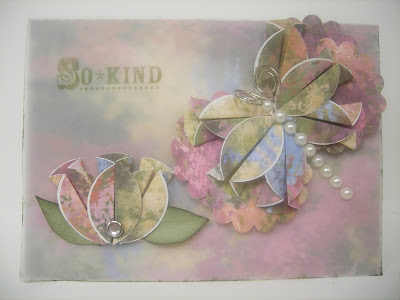
All right, already, back to the challenge! Anyway, here's the card I ended up making. I've been looking at Happy Harmony for about a week now, and I finally decided to ink it up. This isn't the first time I've used it, I just haven't used it in a while. When you have as many stamp sets as I do, it's hard to ink them all up all the time!
Recipe:
Stamps: Happy Harmony
Paper: Brocade Blue, vanilla (cardstock from Michael's)
Ink: So Saffron, More Mustard, Garden Green, silver gel pen (LOVE THESE!)
Accessories: cuttlebug flower folder, wild wasabi ribbon, clear e.p., brayer, sponge
Ok, it's 3:10, so I'm assuming my sister, Thera, has already left DC to come home for the weekend, so I can post this! Ever since I made my cousin coasters for Christmas (if you're browsing through my blog, they are the ones with H on them), my sister has wanted them. So, since she's coming home, and we won't see her until Easter, I thought I would make some for her! I'm also making her a block, I have that somewhere on here too, with pictures. She's been wanting one of those too!
Recipe:
Ink: Black craft ink (which I learned while heat setting this, that this is really good ink, because when it sets, it becomes matte, so you can see where it's dry!), silver ink from martha stewart
Accessories: T stencil from Michael's, sponge, tile from Lowes - it's called Rialto Beige, and they measure 3 3/4 x 3 3/4 square; cork for the backing.
I thought these turned out SO good! I can't wait to give them to her! My valentine is the card that's also somewhere on here with the girl holding the overly large heart, and it has cuttlebug swirls on the bottom. I just love that card! That's one of the bad things about making cards. You make something that you absolutely love, and find a reason to give it, but you don't WANT to give it because you love it so much! Talk about a catch 22!
Anyway, Happy Stamping!!!
Thursday, January 24, 2008
Chipboard Valentine
Recipe:
Stamps: Priceless, All Year Cheer
Paper: chipboard, Lovely Lilac
Ink: Dusty Mauve, Lilac, Pixie Pink Craft Ink, White Craft Ink
Accessories: heart stickers from JoAnne's, white e.p., ric rack, ribbon, white glitter from martha stewart, hole punch, decorative scissors, heart stencil, cotton ball (for hearts)
Happy Stamping!!!
Wednesday, January 23, 2008
Some new challenges!
Wow, today is Wednesday and I haven't uploaded any of my challenge submissions yet this week to my blog! Well, I've been a little busy. I had my first PartyLite training last night. It's just so cool, I really think I'll be able to do this, and do it well. Wish me lots of luck!!!!!
On to the challenges! The first challenge, on Monday, was a Technique challenge. We had to make a Pixie Pouch card. I have never made one, so I was super interested in making one! Once I figured out the measurements, it was a piece of cake! Then, I had to think about what I wanted to decorate with! Oh, the stamp sets that paraded through my head! I chose to stick with Valentine's Day, and that got me started in the direction I ended up in.
Recipe:
Stamps: Time for Fun, Sweet Talk, large cupcake from Hampton Arts
Paper: Ruby Red, Blush Blossom
Ink: versamark, ruby red, silver gel metallic pen, basic brown (for sponging edges)
Accessories: silver e.p.; clear, pink, red and green stickles
Technique: versamark on white paper, then do silver embossing powder, then repeat about 3 times. Then, once the e.p. is hot and kind of liquidy, take away from heat and sprinkle on the e.p. Do this 2 more times. Then, while it's still hot, take your stamp (make sure it's ink free), and press into the e.p. This will etch the image into the e.p. Cut around image and decorate as needed. This is a really cool technique to try if you're still pretty new to stamping!
The second challenge was a color challenge. We had to use Soft Sky, Blue Bayou (both in-colors), and Real Red. I was getting tired of just doing card after card, so I decided to change things up a bit and do a bag instead!
Recipe:
Stamps: Carte Postale, Garden Silhouette
Paper: Soft Sky, Blue Bayou
Ink: Blue Bayou, Real Red
Accessories: scallop punch, 2 sizes circle punches, ribbon, sponges
Technique: 2-5-7-10 box (tutorial found here)
The third challenge, today, was a sketch challenge. Or, layout challenge. All day, I thought about what I was going to do, and I finally came up with this. I started out with 3 different color families, and ended up with 2 colors! Funny how that happens! And I ran out of room! The card that I used was smaller than the white cards that I normally use. I get the 25 packs from Michael's, and use those as the bases for my cards, or use them as paper to stamp on and add to colored paper. It's just so much easier and cheaper than buying ream after ream of white cardstock from Stampin' Up!. I thought about making this into a baby boy card, but I ran out of room! And my stars were too big, so I ended up only able to use 1! Darn! They were so cute when I got them out of the cuttlebug!
Recipe:
Stamps: Stars & Swirls
Paper: Brocade Blue, vanilla, So Saffron
Ink: So Saffron, More Mustard
Accessories: cuttlebug swirl folder, sponging, paper piercer, brayer (to go over the swirls)
Happy Stamping!!!
Saturday, January 19, 2008
Girls Night Out 2
Ok, here are the other two cards that I made. They aren't that great. The first one is a criss cross card. It's ok. It's the first one that I ever made, so of course I don't think it's that great!
The second one was the last card I made of the evening. Can you tell? It's not that great! I had to do masking. So, I masked the popcorn and the box of popcorn.
Happy Stamping!!!
Girls Night Out 1
Friday, January 18, 2008
Valentine card background challenge
Valentine's Mailbox
Yesterday I went to Target, and I am always scouring the dollar bins to see if there's ever anything "crafty". Well, last night I hit paydirt! I got 2 mini mailboxes, 2 Valentine buckets, and 4 containers of Valentine ribbon that had 3 or 4 different spools of ribbon inside! So, we came home, got the kids in bed, and I went downstairs and created this mailbox. It's the best I could do at 11pm!!!!
Recipe:
Stamps: All Year Cheer III
Paper: Red Cardstock, Figgy Pudding
Ink: White craft, silver gel pen, versamark
Accessories: white e.p., clear e.p., assorted ribbon, 3-d pop up dots, UTEE e.p., heart stencils
I did versamark and UTEE e.p. over and over again about 5 times for the heart on the flag. Then I cut the heart out and stuck it in the freezer for about a half an hour. I took it out and cracked it, which gives the appearance of cracked glass.
Happy Stamping!!!
