Friday, February 29, 2008

Certainly Tempting Carte Postale

Today's challenge on Splitcoast was a Limited Supplies challenge. I really like these because you are limited in what you can use. Today we could only use 1 flower stamp, 1 sentiment stamp, no cuttlebug, no designer paper, no rub-ons (which that was easy for me as I don't have any!), no background stamps, but we could use as many embellishments as we wanted. So, I decided to use Tempting Turquoise and Certainly Celery. I wanted to use Turquoise as my main color, but thought it would be too loud, so I just used it as an accent. I added vellum for 2 reasons. 1. Because it added softness to the card and a little contrast and 2. because I love vellum and I haven't used it in quite a while!


This was my submission!


Recipe:
Stamps: Carte Postale
Paper: white, Certainly Celery, Tempting Turquoise, vellum
Ink: Certainly Celery
Accessories: nail file for turquoise edges, turquoise eyelets, sponge


Thanks for stopping by!
Happy Stamping!!!

Twinkle, Twinkle Little Star....

Yesterday's challenge on Splitcoast was to make a card associated with music. It could have music notes on it, have lyrics on it, anything to do with music. So, instead of a card, because I LOVE making things that are "out of the box", I decided to make a box! I have been saving some of my PartyLite boxes for templates and have been wanting to make a box out of paper for a while. This provided the perfect opportunity! So, I figured out what I wanted to do, but couldn't come up with a song that I could stamp to! I looked at some of my favorite songs, but nothing clicked. Then I looked online for kids songs and I came acros quite a few, but decided Twinkle twinkle little star would work perfectly! Besides, that's my son's favorite song! I have to sing it to him almost every night at least 5 times!
So, this is how it came out! I was very excited to see the end result!

Recipe:
Stamps: Stars & Swirls
Paper: Ballet Blue, vanillla, gold shimmer paper from DCWV (I think!)
Ink: More Mustard craft, black gel pen
Accessories: Heat & Stick Powder, Dazzling Diamonds, pop up dots, star template, votive holder box template

Happy Stamping!!!

Thanks for stopping by!

Wednesday, February 27, 2008

Coffee and Chocolate

Today's challenge on Splitcoast was a sketch challenge. I always love to do the sketch challenges. And today's WAS a challenge! In more ways than one! I couldn't decide what stamp set I was going to use, I couldn't get to my desk to do the actual card until 9:30 tonight, and this challenge really was challenging for me! Which, that's always a good thing!


So, here's what I came up with! I have had coffee on the brain for a couple days, trying to come up with some ideas for someone's project I will be working on, and so why not break out one of my favorite sets Like It A Latte! And I have a whole bag of coffee beans for my PartyLite presentations, so it all ties together! I don't know if I can take credit for the quote on the card or not! I changed the second sentence to suit my purpose. Does that count? The author is "Unknown" anyway, so does it even really matter??? I think not! I find all of my quotes here. They have the best quotes that I have been able to find on the internet.
Recipe:
Stamps: Like It A Latte; How Sweet It Is ~ My Favorite Things
Paper: Choc. Chip, Close to Cocoa, vanilla
Ink: Choc. Chip, Basic Brown, Rose Red, Souffle gel pen, white craft ink
Accessories: coffee beans, ribbon, pop up dots
Technique: masking - for the straw so it looks like it's really in the whipped cream!

Happy Stamping!!!

Thanks for visiting! Please come again!

Tuesday, February 26, 2008

Try a New Technique - Designer Paper Crash!

Yesterday's challenge on Splitcoast was a Try a New Technique, and we had to use different designer paper on the same card! So, polka dots and stripes and flowers and whatever, all had to be on one card! AAAggghhhh!!!!!! Usually, I stick with one theme and that's it! But, actually, I just used polka dots and stripes, so it wasn't too bad! It was hard though, trying to place everything and how to make it look "just right"! Here's how it turned out!


Recipe:

Paper: white, d.p. I have no idea where it came from! No co. info on back, and I don't even know where or when I purchased it! Sorry!
Ink: black, white craft, silver gel pen, black gel pen, white paint marker
Accessories: sponge, Prima flowers, brads from SU! hardware, brown ribbon
Happy Stamping!!!

Paisley, anyone?

Today's challenge was a color challenge using River Rock, Whisper White and Basic Black. I wasn't going to do the challenge, but after seeing some really cute cards, I decided to try it! I started out using the Paisley background stamp and then using the Polka Dots and Paisley set. I was making a traditional card, when I came up with the idea to make the entire card in the shape of a paisley! Whatever that's called! So, this is how my idea turned out!


Recipe:
Stamps: Polka Dots and Paisley, Paisley background
Paper: River Rock, Basic Black
Ink: White paint, black sharpie, black gel pen, silver gel pen
Accessories: sponge, pop up dots, black and white polka dot ribbon
Happy Stamping!!!

Tuesday, February 19, 2008

Garden Opulence

Today's challenge was to use Orchid Opulence, Certainly Celery and Pumpkin Pie. A rather motley crew of colors to say the least, but when put together in the right way, which there were many different ways on Splitcoast in the gallery, the colors really do compliment each other!

I don't really care for the Orchid Opulence paper, even though the marker, which is lighter, is not so bad. This was also the opinion of many others as they posted their creations.
Here's what I came up with:


This was a super easy card to make! And since I LOVE to paper pierce, I thought I would go a little piercing crazy! I think next time, I'm going to try piercing backwards and see what effect I get!
Anyway, here's the recipe:

Stamps: Garden Silhouettes

Ink and Paper: Orchid Opulence, Certainly Celery, Pumpkin Pie, and I did use a little bit of white c.s. for the flower to go on.

Accessories: paper piercer, mat pack, sponge
I would have typed and printed my sentiment out, DAD!, but my computer is on the fritz and I can't even open up Microsoft Word. So, had to write it. It doesn't look TOO bad!
Happy Stamping!!!

Monday, February 18, 2008

Try a New Technique Monday - Envelope Pouch

Today's challenge was to make an envelope pouch. Here is the tutorial. This was SO easy! And you can use any stamp set, any colors, anything you want! All you really need is an envelope! It would help to have a tag punch, but you can improvise if not!


Here's mine:


Recipe:

Stamps: Roses in Winter

Paper: white envelope (any size will work), Cameo Coral c.s., white c.s. for the rose card on front

Ink: Cameo Coral, Mellow Moss, Basic Brown for sponged edging

Accessories: ribbon, sponge, large tag punch


Very easy! You should try it!


Happy Stamping!!!

Friday, February 15, 2008

Burberry in paper

Yesterday's challenge was Ways to Use It. And we had to make something fashionable. As I looked through the gallery, I found lots of shoes, some were SUPER cool! And some purses, and some dresses. But, mine was TOTALLY different! It's a replica of a real BURBERRY purse! Every time I hear or say that word, I feel like swooning! That's how much I LOVE Burberry!


If we had inspiration, then we had to link the inspiration picture to it. So, here's my inspiration.

And here's what I came up with!


Recipe:

Paper: Creamy Caramel, Basic Black

Ink: Bravo Burgundy, Basic Black, Painter white opaque marker, silver gel pen

Accessories: pearls


This purse was SO easy to make! The hardest part and what took me the longest was painting the white inside the black lines!


Happy Stamping!!!

Tuesday, February 12, 2008

How Sweet It Is - Pregnant!

Today's challenge on Splitcoast was a color challenge. We had to create something with Tempting Turquoise (MY FAVORITE SU! COLOR!!!!), Green Galore, and Kraft. Since I don't own any Kraft paper, whatever that even is, I used Close to Cocoa. I have been thinking of my cousin, Maria, who emailed a couple weeks ago, letting us know she was having a baby. So, since her email, I have been trying to get a card done for her. There have been so many things that have gone on since her email, I haven't had a chance! Until tonight! I was busy playing in the snow with my family today, so it had to wait until dinner time. Then, I had to figure out what stamp sets I was going to use! I decided to use my BRAND NEW My Favorite Things sets. So, I took out all of my new ones, and decided to do How Sweet It Is, and make the woman pregnant, and go from there! So, this is how it ended up!


Recipe:

Stamps: How Sweet It Is, Twisted Sentiments

Paper: Close to Cocoa, Tempting Turquoise, Green Galore

Ink: Tempting Turquoise Reinker, Black, Tempting Turquoise marker, Souffle Saukura pen, Chocolate Chip, Close to Cocoa
Accessories: Prima flowers, hole punch, eyelets, brads (I covered the silver brads with the Souffle Saukura pen)
Thanks for stopping by!
Happy Stamping!!

Monday, February 11, 2008

Sympathy in Roses


This was actually the first card I made today for the Technique challenge. I needed to make a sympathy card, so this was perfect. Maybe a little too splashy, but oh well! Anyway, here's how I made it.
I took a piece of Kodak picture paper and sprayed with water. Then, I put droplets all over the paper in Regal Rose, Almost Amethys and Wild Wasabi Stampin' Up reinkers. Then, I took another piece of Kodak paper (which you can use regular glossy paper, but I didn't have enough, so I just used the Kodak paper. Regular photo paper that you put through your printer will work as well....) and smashed it on top the reinked paper. Once it's good and smashed, carefully lift the top sheet, and set aside. Then do the same thing again. Make sure you spray your top sheet so the colors meld together. And then the base original image gets lighter and lighter with each smashing. Then, once it's dry, you're supposed to be able to stamp right on it. However, since this was my first one, I thought I would just be able to put embossing powder on it and it will dry. NOT TRUE! However, I did put Kaleidescope embossing powder over the entire 4x6 picture and heated it and it did work. Then, I stamped the Roses in Winter with Regal Rose and Wild Wasabi, and adhered with pop up dots to card. Then, I took a regular scrap of paper and wrote out With Sympathy. I don't have any nice sympathy stamps, especially for something so little. So, I just wrote it. Then, I sponged the edges with the rose and wasabi, and then dragged each side through Choc. Chip to add depth.


Ok, enough talking!

Thanks for visiting!
Happy Stamping!!!

Try a New Technique Monday - Ink, Spray, Smash!

Today's challenge on Splitcoast was to do Ink, Spray, Smash on glossy paper. Well, I have glossy paper, but not enough to do this! So, I used Kodak photo sheets instead. I will never be able to use them, so this was perfect.....Well, not so much! The ink wouldn't dry, but evaporated instead! So, I kissed cardstock to it once I got the look I wanted, and then worked from that. So, I did the window, and then stamped the two "gossipers" on top of it. I put acetate on top of that so it really does look like a window in real life! I stamped the bushes and flowers and then cut around them to pop them out. I think this turned out SO cute!!!!


Recipe:

Stamps: My Favorite Things: Meet Me at the Cafe, Twisted Sentiments; Stampin' Up: Sweet on You, Smorgasborders

Paper: glossy Kodak picture paper, acetate, vanilla

Ink: Black, Regal Rose, Lovely Lilac, Gable Green, Not Quite Navy, So Saffron, Sahara Sand, Tempting Turquoise, Brocade Blue, Versamark

Accessories: Clear e.p. for the flower box, glossy glaze for the table top, chairs, and window reflections


Thanks for visiting!

Happy Stamping!!!

Sunday, February 10, 2008

The winner of the My Favorite Things

Well, I was not the winner, and rightly so! The winner had an absolutely FABULOUS entry! Here is what Lov'n Life n Vegas entered: A paper Longeberger basket!!!!


Isn't it awesome!!!! And she even came up with a tutorial! So, I can't wait to try this out! What a great idea! So, congratulations on your win Lov'n Life n Vegas! You totally deserve it!


Happy Stamping!!!

Friday, February 8, 2008

The Love Bug recipe

Ok, so I finally got back to my blog! I felt like I was online all day because I didn't accomplish half of what was on my list of things to do today! I didn't have any other kids today, just my own. Which is always nice and refreshing! And I wanted to do some housework, insert Mr. Yuck face here! I think all I got done was the laundry! Oh well! At least I got something done! LOL!

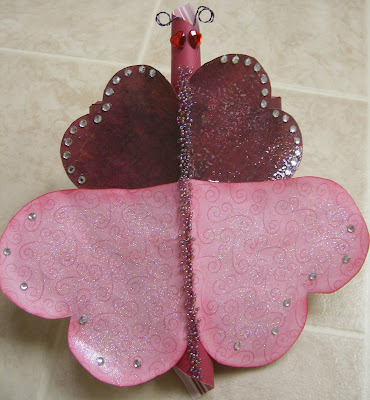
Anyway, back to the subject! My Love Bug! As I said yesterday, I was going to make a Bug car, and have it be a convertible so you can reach inside for the candy or whatever....but, it didn't turn out the way I wanted it to! So,my subconscience was working on the butterfly design, so I decided to just go with that. And, it worked!

Here are all the details so you could make your own!

Butterfly Wings are Colorbok Burgundy Crackle for the smaller ones, and SandyLion Cinderella Pink for the bigger ones. For the big wings, I sponged Regal Rose all around, cause you know how I like my sponges!, and then smeared Crystal Effects all over both hearts. I sprinkled some Martha Stewart glitter and wasn't getting the shimmery effect I wanted, so I sprinkled some Dazzling Diamonds and it worked like a charm! Then, I put on some self adhesive rhinestones around the edges. For the smaller hearts, I Versamarked the entire heart, both of them, and then poured UTEE (Ultra Thick Embossing Enamel - found at Michael's) over them and heated. Then I added more rhinestones and adhered with Crystal Effects.
For the body, I rolled up a sheet of paper. I think the dimension was 8x8. I don't remember who the co. was that made it. Wait, it's coming back to me.....Rose Stripe from Colorbok. Apparently I like their paper!

The box underneath is just a jeweler's box, that I covered in Bravo Burgundy and stamped hearts from Gina K's Design stamp set Just So Hippy in Elegant Eggplant. The inside of the box is just some Valentine-ish paper that I had in my stash. It worked perfectly for an insert!

I sticky stripped everything to everything. I love that stuff! I should buy stock in it, I buy so much of it! I buy 2 or 3 rolls at a time! And I buy it like, once a month, if not sooner! The beads on the butterfly's back is a strip of Sticky Strip, and I poured pinkish/purplish beads. It was boring, and all you could see was the hearts connected, so I wanted to hide that and make it cool.
For the eyes, I used rhinestone hearts that I have had for at least a year. I just can't get rid of those darn things!!! I got purple wire and twisted it, and made it into an antennae, and adhered it in between two 3-D dimensionals and stuck them on the inside of the rolled up body.

I don't think I missed anything!
This was such a fun challenge! I love it when I have to think outside the box! Or, think outside of my comfort zone! And I love coming up with these crazy designs! I hope they keep them coming!!!!

Anyway, that's it for now! I have to go prepare for my 3 PartyLite parties tomorrow, Sunday and Monday! Woo hoo!!!

Happy Stamping!!!

Thursday, February 7, 2008

My Favorite Things Guest Designer Challenge

Last night was another "online" cocktail party for My Favorite Things. I love their stamps! So, I'm always just reading along because I haven't figured out how to unsubscribe to the thread, and still participate! Plus, I had to get the kids in bed, and it was after 9 before that happened. So, I just read along, which was funny because all people did was say Hi to each other! There were other conversations as well.

Anyway, they always have a guest designer challenge after every release, which is once a month. So, of course, I still entered something in! You never know unless you try, right?


So, here is what I made:


I wanted to do a Beetle card, but the paper looked really bad when I was putting the "glass" on. So, I still have it sitting on my trash desk. Hopefully tomorrow, I'll be able to actually SEE my desk!!!! But, anyway, I decided to do a butterfly instead. It worked out! I like how it came out! Please, leave a comment and tell me what you think!
Details tomorrow. I can barely keep my eyes open!

Tuesday, February 5, 2008

Color Challenge 2-5-08 & MFT Sketch Challenge

Today's challenge, well, for me it's still Monday night! I haven't gone to bed yet! Anyway, today's challenge is to make a card using Apricot Appeal, Real Red, and Ballet Blue. Interesting combo! So, this is what I came up with, at this late hour! I figured I would get it done tonight so I can just look at everyone else's tomorrow and I don't have to rush before the kids get here in the morning to get one done and uploaded! Plus, I have a meeting tomorrow evening, so I won't get a chance to get another one in. And you know me, I have to do every single challenge! I did another one earlier for My Favorite Things Sketch Challenge. If there's a challenge, I have to do it! Speaking of My Favorite Things, they are having a cocktail party from 9-11 PM EST! Come and hang out! They are releasing 2 or 3 new sets at 10:30 that night. I'm excited to see what they come out with! I won't be purchasing any, as I am trying to pay off my credit card. If you are in the Pittsburgh area, let me know if you would be interested in having a PartyLite party! (This is how I am paying off my credit card and buying new stamps!) My email address is smetak@connecttime.net.
Anyway, here's the color challenge:

Recipe:

Stamps: Fiskars from JoAnne's (clear stamps)

Paper: Ballet Blue, Real Red, Apricot Appeal

Ink: Apricot Appeal, Real Red, Ballet Blue, silver gel pen, black, Basic Brown for depth

Accessories: paper piercer, sponge, mat pack, Real Red ribbon, silver brad, crystals, spiral punch, hole punch


This second card was literally done in like half an hour! The picture is a little foggy because I forgot to change the setting on my camera. Seriously, this thing has SO many settings! I can't keep them all straight! The sentiment is pretty crude, I know. However, My Favorite Things is coming out with a stamp set that is twisted. So, it's like a twisted play on words. So, I figured I would do the same thing. I'm talking about snowballs though! LOL!


Recipe:

Stamps: My Favorite Things - Baby, It's Cold Outside

Ink: Night of Navy, Bordering Blue, Brocade Blue, black, Pumpkin Pie, Blush Blossom

Paper: Bordering Blue, Brocade blue, Ballet Blue, white

Accessories: ric rack from dollar bins at Target, heat and stick powder, dazzling diamonds, white puffy paint, clear stickles, aquapainter, scallop punch, snowflake folder for Cuttlebug


Thanks for visiting!

Happy Stamping!!!
Monday, February 4, 2008

Fortune Teller Folded Centerpiece

Today's challenge was to make a fortune teller folded centerpiece. I remember making these in school! I'll make another one after the kids leave today and Kevin goes to Starbucks! Here are the directions to make your own!


Recipe:

Stamps: Looks Like Spring

Paper: 12 x 12 retired SU! d.p.

Ink: Basic Brown

Accessories: sponge, ribbon from Michael's and JoAnne's, scallop punch, flower punch (retired), 3-d dimensionals

Thanks for visiting!

Happy Stamping!!!