Sunday, November 6, 2011

Pamper Yourself!

This weekend I finally had a chance to tackle an order that has been waiting quite some time.  My brother's girlfriend and her mother own a spa, and they have asked me to create gift certificates for their clients.  I have made several sets for them.  Fortunately business is good, and they are flying out of their spa!  They have asked me recently to make another set!
I just love how these have turned out!


To create the front, I used MFT's Sew Nifty Die-namics for the mannequin, and the stamp set for the image.  I also used their Swirly Flourish Die-namics for the swirl, and the Zig Zag Die-namics layered on the ribbon.  The WTG Girls Day In  set by MFT provided the sentiment, which works perfectly for this genre!  The bird and sentiment are punches from SU!.  The Eiffel Tower is stamped and then cut out.
I wanted to go vintage/French/definitely female.  I hope that I have achieved that look.

The inside was done in Word.  I downloaded special font, included their logo in the corner, and the bottom has their information which I was able to pixelate in Picnik to protect their privacy.  I pixelated their logo a little bit.

So, besides these 20 gift certificates that I have created, and a few scrapbook pages, I really have not had any time to stamp.  I'm really bummed about that and hope that it changes soon!  Christmas is coming, so that means that Christmas cards will need to be started!  I have started brainstorming on some ideas.  I look at my Santa stamps and just wish I had time to play around w/ them!  I know I could come up w/ some really cute ideas!  One of these days!  LOL!  My Pampered Chef business has taken off, so I have been busy w/ that!  That's why I'm at my office desk instead of my craft desk all the time!  Haha!

Well, I'll see you all soon w/ a new project!  I have some teacher Christmas gifts to make and I don't want to bombard myself w/ projects 5 days before Christmas break starts!  Time management!!!!!

Have a wonderful day!

Monday, October 10, 2011

The Pumpkin Patch!

What could be better on a sunny afternoon than going to the pumpkin patch w/ your kids?!  My mom and I have been doing this since my oldest was a baby!  We would go and take pictures with the biggest pumpkin, the tractors, the cornstalks and hay bales, and yards and yards of pumpkins just waiting to be decorated by little hands!  This year was no different!

I took pictures of them sitting on pumpkins, then holding baby pumpkins on their heads (my son came up w/ that brilliant idea!) ;D  We took pictures of each of the kids sitting among the miles of pumpkins, and by the beautifully vibrant mums!

That evening I uploaded the pictures to my computer and formatted them to my liking for Facebook sharing, and decided to print a couple off to take w/ me to a crop that I attended this past weekend.  It was rather funny (to me), that several people thought that I was up to date on my scrapbooking since I was working on something SO current!  Hahahaha!  Oh, if they only knew!  I WISH I was current!  I fell off the bandwagon about the time I had my first daughter.  Perhaps one day I'll get back into a routine of doing scrapbook pages daily!  Or, at least once a week!  For now, though, it will have to be when I'm inspired, and when I have a whole day!

I'm so inspired by the gorgeous creations from Swirlydoos and their subscribers and design team.  I decided to take my embellishments, sprays, inks, sponges, stamps, embossing powders and papers, and create a page!  At least it would keep me busy for the better part of the day!  The crop was from 9am to midnight!  I had a whole day, uninterrupted by children and their activities!

Here's what I created!


 This is the full page view
 Here's a closeup of the flourishes and basket of pumpkins
 A closeup of my embossed and sponged chipboard letters

This is a little collage of each of my kids in the same spot on the farm

Have a GREAT autumn harvest!

Here are the details (as best as I can remember!)
Paper: Prima dp; Choc. Chip; chipboard; Kodak Photo Paper; white c/s; a smidgen of Tim Holtz's Christmas paper (for the grass)
Ink: Tim Holtz Distress Inks; Tattered Angels Glimmer Mists
Embellishments: Flourish die from MFT; roses from Prima; leaves behind chipboard letters, basket of pumpkins and pumpkins in corner from Kitchen Sink Stamps; scallop border tearing edge from Creative Memories; Smooch ink in green for vines on background paper; Tim Holtz rosette die that I made into a fence

Sunday, September 25, 2011

Swirlyhues First Storyboard Challenge!

Hi there!  Yes, it's been a while!  I have hit a creative funk, or brick wall, and have not really been crafty in quite some time.  This weekend, though, I think I finally pulled myself out of it!  I was invited to join a new group of some awesome and fun ladies that gather at Archivers in OH!  What a fun day that was!  I didn't want to bring cards to work on, so I brought all of my supplies to create a scrapbook page for Swirlydoos FIRST Swirlyhues Challenge!  Anyone can enter!  You don't have to be a subscriber!  Although, why wouldn't you?  The products in the kits are amazing!  I get excited every time I get my click 'n ship email notification!!!

Anyway, on to the scrapbook page!

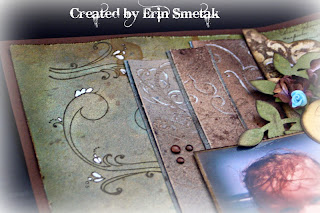
The rules for this challenge:  Follow the color scheme, follow the sketch, and use a tutorial that is posted on their website.  The tutorial I used was Emboss Resist.  I embossed swirls on all of the strips of kraft paper.  Then I took my Tattered Angels Glimmer Mists and sprayed all over the strips.  And then I took my Smooch ink and highlighted the swirls. 

 This is the whole page!
 This is a shot of the emboss resist on the strips of paper.  For the swirls on the background paper, I cut out the swirl on another piece of paper, and laid it down and sprayed over top of it.  I took the paper away and then stamped the swirl on top of the ghost image.  I added Smooch to the little loops to add detail and contrast.
This is the bottom.  Lots of detail here!

Details:
Paper: Et Cetera Ledger - Bo Bunny; Kraft, So Saffron, Baja Breeze
Ink: Moonlight, Tattered Leather, Olive Vine, Gingerbread - all Tattered Angels Glimmer Mist
      Walnut Stain, Frayed Burlap, & Brushed Corduroy - T.H. Ranger Distress Ink ~ All along the edges of each piece of paper
Embellishments:  French Flourish - wooden border at the bottom interlaced w/ assorted ribbon; UTEE, Versamark - embossing elements; brown brads; circle punch; Prima Flowers; Smooch ink - Turquoise; assorted flourish stamp; T.H. Distressing Tool; Zva Creatives rhinestone flourish; Turning a New Leaf die - PTI

Sunday, September 4, 2011

"Time" for a change!

Last Christmas, I received a clock similar to this one:


I am a substitute player for my mom's Bunco group, and the subs get to come to the Christmas parties and end of year parties.  It's a White Elephant party for Christmas, and one of the ladies had a clock like this in her garage that she wrapped up and gave!  I was lucky enough to receive it, and knew right away that I could re-purpose it!  This clock that I'm showing you is a lot nicer than the one that I got!  LOL!  It had the yellow plastic around it, but in the middle it was a picture of some advertisement for a pharmaceutical drug!  Um, yeah, I really want to hang THAT up in my house!  LOL!

It has sat on my desk all year, just waiting.  Well, I had some time on my hands this week, and I decided to tackle it!

Here is the result!


So, what did I do?!  Here are the details:

I took the clock completely apart, and measured the inside where the numbers are.  I took a piece of white 12 x 12 c/s and drew a circle around the clear part that goes inside and hugs the plastic.  Then, I took Antique Linen and Tea Dye from Tim Holtz and w/ my sponge applicator, sponged around the edges to give it an aged look.  I sponged Choc. Chip all around the edges to finish it. 

For the numbers, I took two different sets: Recollections Big One Double for the large numbers, and Inkadinkado's Somerset Alpha. for the smaller numbers.  The ink is Brilliance Pearlescent Chocolate.

For the stamps in the middle, I used all Kitchen Sink Stamps: Multi Step Ivy for the ivy behind the fruit; Multi Step Peach; Multi Step Berries; and 3 Step School Days for the apple.

For the yellow plastic:  This was hard!  The first time around, I sprayed the whole thing white.  Then, I took Tim Holtz's Picket Fence Crackle Paint and slathered it all over.  Once it dried, it took away the paint and showed the yellow!  Yikes!  SOoooo, I had to start all over again.  I sprayed it once again w/ white.  Once that was dry, I sprayed sealer all over it.  I let that dry.  Then, I put 2 coats of the Picket Fence Crackle paint on.  Once that was dry, I sprayed a little, ok, a lot of Tattered Angels Tattered Leather Glimmer Mist.  Once that was dry, I once again sprayed a sealer and let everything dry.  And thus, you have aged plastic!  LOL!

I took my other plain clock down, and put this one up!  OMG, I LOVE IT!  My family even loves it!

Do you have something in your stash ready for re-purposing?!  Now would be a GREAT time to dig it out and work on it!  Have fun!

Friday, August 12, 2011

A scrapbook page done!

For those of you who know me best know that I don't often scrapbook.  It takes FOREVER, where a card only takes a few hours! 

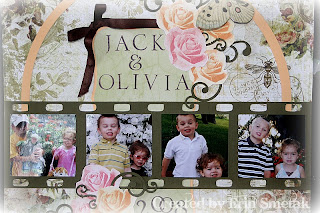
But.....  I was inspired by Swirlydoos' Sketch last month for the Vintage Fae kit, and decided to work on it!  I started it before I left for the beach, which was around the end of July.  So.... I've been working on this for 3 weeks give or take!  And now I have finally finished it!  I had to tweak it a little because I'm not at the Swirlydoos level....yet!  And also, I am LOVING all the delicious Prima flowers that come in the kits, but I'm totally hoarding them!  I can't part w/ them!  Even if it's for my own scrapbook!  Instead of Prima's, I stamped Kitchen Sink Stamps Hearts and Roses roses.  The rest I'll tell you about after the pictures!

 Here's a closeup of the roses and the pics of my kids.
Ok, here are the details:
Paper: Apricot Appeal, designer paper from PinkPaislee Butterfly Garden; and a random mossy green from the kit, Vintage Fae.
Stamps: Kitchen Sink Stamps Hearts and Roses; alphabet and numbers from Inkadinkado's Somerset Alpha.; little swirl under the numbers is from Cloud 9 Design's Simple Thoughts - Travel.
Embellishments: the swirls are punches; the huge semi circle was cut using my Cricut; the word panels are Labels 8 spellbinders; the filmstrip was also cut using my Cricut.  I hand cut the butterfly from another dp from the kit; the ribbon is twill from Amuse Art Stamps.

Tuesday, August 9, 2011

I'm back! And I've been busy!

I'm back!  This summer has been quite crazy!  We just came back from a wonderful vacation to Myrtle Beach, SC!  And now that we are back, and aren't planning on going anywhere soon, I can get back into stamping and hopefully scrapbooking!  We'll see what happens!

Anyway, so while we were on vacation, we had some terrible news about two deaths in the family.  So, as soon as I got home, I got to work on some sympathy cards.
Then, my sister asked me to make a baby shower card for a friend of hers.  And lastly, I visited a friend this past weekend that was in town that I had not seen in several years, and they had just recently moved into a new house!

So, here we go!
First up, a sympathy card for my great aunt.

 Stamps used: Kitchen Sink Hearts and Roses and Big Leaves.  Sentiment by My Favorite Things: Clearly Sentimental about Sympathy.

Next is a sympathy card for my cousin.
 Same sets used from the first card.
 Here's the inside.

This is the baby shower card for my sister's friend!
 Stamps used: Kitchen Sink Stamps Multi Step Baby.
And this is the front of the envelope, using the same KSS set.
 And lastly, my friend's new home card.  I looked at her pictures of the inside of the house and I chose Sage and Brown.
 Stamp set used: Fifth Avenue Floral by Stampin' Up!.
And that's what I've been up to this last week!
Have a great day!

Monday, July 11, 2011

Kitchen Sink Goodies! - a public service announcement to multi step stampers

OMG, I just HAVE to share!  Kitchen Sink Stamps has come out w/ some VERY awesome stamp sets and a new way to store those awesome sets!!!!  You have to check them out HERE!!! Such fun sets that you cannot live without!  And the cases are perfect!  You can fit 4 small sets in one!  Or a large set, and two small sets.  Or 2 large sets.  Or, 2 medium size sets and a small set.  Or....... Think of all the possibilities and SPACE you'll save now!!!!  And your collection will be so nice and organized!
AND, if you go to one of the design team blogs, they have a code that you can use and get 10% off!!!!  Even MORE incentive to stop over at the 'sink and grab up some goodies!!!!

Have a great day!
Now back to your regularly scheduled program!


This is not a Kitchen Sink Stamps promotion.  This is purely my own doing, based on the enthusiasm that I hold for Kitchen Sink Stamps!

Friday, July 8, 2011

A VERY Belated Father's Day gift!

As you've probably guessed from recent posts of mine that I'm ALWAYS behind the 8 ball!  Well, just recently, as the summer picks up w/ stuff going on, trips to take, and the ever pressing swimming to do!  ;)  So, the crafting takes a back seat.

I had a shadow box in my hoard of alterables for quite a while now.  Just waiting to be used.  I looked at it one day and decided I was going to use it for my dad.  On Father's Day, we went over to my parents to swim, and before we left, I took a picture w/ him w/ each of my kids.  I FINALLY got the pictures developed and then they sat!  Finally, I had enough time to at least get started.  Just around that time, SVG Cuts came out w/ 3-D letters.  I'm ALL about 3-D anything, so this was totally up my alley!  And it was the perfect thing to add to this shadow box!

On a recent trip to OH for Stamping Around OH, my friend Wendy and I stopped at Archiver's and Hobby Lobby where I stocked up on Graphic45, Crate Paper, Bo Bunny, etc.  All vintage papers!  I was, and still am, in heaven!!!!  And I figured out that it's cheaper to get the individual sheets as opposed to the kits that you get.  Because I don't do stickers, and all the other stuff that they put in there.  I just want the paper to do w/ what I want.  I really did well that trip! Money wise!  I even had money in my pocket when I got home!  RARE!  Let me tell you! 

Anyway, so I used some of my new papers in here!  The calligraphy that you see at the top of the Time Book sheet and the ticket saying "Happy Father's Day" is my own.  I listed each one of my children, and then put a check mark under the appropriate number that reflects their ages as of May, 2011.  (In June, they all had a birthday!)  I did a little stenciling (never done before!) to add some graphics and spice it up a bit!  I'm not as good as the experts, but it's my first time!  And now I know I need to start looking at purchasing more stencils!  LOL!  The hardware is all from Tim Holtz.


And here's a closeup of the letters so you can see how they really POP!

I can't wait to give this to him!  He's going to love it!  (He's a huge fan of my work!)  My husband loves it so much that HE wants one for his office!  Better get to work now, or he won't get it til next summer!!!!  Hahahaha!  ;D

Sketch Challenge - MFT

Hi there!  Back again w/ 2 cards that I made for this week's sketch!  The first one is a birthday card, and the second is my anniversary card to my husband.

Here's the first one.  I was experimenting w/ some Graphic45 paper I received from my Swirlydoos kit this month!  The kit is Vintage Fae and there's lots of vintagey goodness in there!!!  You should definitely check it out HERE!  The sentiment on this card is actually from Clearly Sentimental About Happy.  Well, that's what I'm calling it.  I received it as a free gift when I purchased a couple (ok, a TON) of stamps from MFT when I was at CHA last summer!  Oh, and the flourish die on the bottom right is also from MFT, along w/ the scallop border in the middle!


This card was fun to make because it is for my sweetie!  We celebrated our 9 year anniversary on July 5th! 

I purchased this set only a few weeks ago, but even when it first came out, I knew I would use it for an anniversary card!  I got the idea from Jodi Collins' card here!  I, of course, had to change mine up to fit the sketch, but the basic idea is the same.  Thanks Jodi!
My faces are colored SO much better now that I know what I'm doing!  And what colors to use!  I watched Sherrie Siemens' video on skin and hair (still struggling w/ hair!  Don't judge too harshly!) that you can find here.

The reason the card ended up being pink and black is that those are our wedding colors! I know it's girly for a guy to get a pink card, but oh well!  What can you do?!

The set that I used is a Flapper Doodles set called I Love Us (appropriately named!).  I used several MFT Die-namics on here.  The open bracket die, the flourish die, and the flower in the middle.  W/ the open bracket, I cut as normal for the pink c/s.  For the black behind it, I wanted to create a background, so I just embossed it and then hand cut it around the edges.  For the ring around the couple, I drew lines w/ my Spica pen, and then in the spaces that I created, I stamped a heart (part of the set).

Have a wonderful day!

Happy 4th of July!

I'm sure you're wondering if I'm off my rocker!  I'm not!  I promise!  I misplaced my memory card USB, and I finally had a chance to do some uploading, therefore, I'm a little late!  But I hope you all had a nice 4th of July!  We did!  LOL!  We came home from Gettysburg on the 4th and went over to my parents' to swim and have ribs for dinner!  OMG!  YUM!!!!

Well, MFT had their monthly guest designer contest that ties in w/ their monthly (really bi-monthly!) release.  The challenge was to use texture!  I had to participate!  I LOVE adding texture to my cards and creations!  And layers and embellishments and ....  You get the picture!

So, this is what I created.  It's a pennant card and I gave it to my mom and dad for the 4th just because.  I normally don't give cards just for the heck of it, but I felt like this was a perfect opportunity!  And guess what?  They actually received it ON the 4th!  Imagine that!  ;D

Isn't Fred Bear SO cute?!  Ok, the texture parts are the stars (embossed) and the corregated Crumb Cake panel w/ white paint splotches.

Here are the details:
Paper: Night of Navy; White; Cherry Cobbler
Stamps: Fred Bear Well Done; Mini Banner Alpha.  (both My Favorite Things)
Ink: Copics (variety of colors); Cherry Cobbler, Memento Black, white paint
Embellishments: pennant die - SVG Cuts; Simply Scallops die-namics (MFT); stars - star punches (SU!); mini banner - Mini Banner Die (MFT); Stars Border- (MFT); Maraschino Twine - The Twinery, sold by MFT

I hope your 4th was a fun day!