Just to warn you: This will be a long post!
For Christmas for my cousins, I decided to decorate two boxes. These are no ordinary boxes! They are actually boxes that held wooden/metal dolls w/ clothes that attached magnetically. Like paper dolls, but w/ magnets. My older daughter received a set for her birthday, or last Christmas, and we have been moving the box upstairs, downstairs, everywhere! And one day I was looking at it, and it dawned on me that it looked like those boxes that are oh so famous that people are redecorating each little cubby! Like THIS for example! My youngest daughter got a set for Christmas this year, and I used hers for the other one!
They were originally pink, and I spray painted them white, and then black. Then I sanded down the edges a bit to give it that worn look.
Here's the first one I made:

And there are two boxes that I had not finished when I took this picture. I can't remember why I took it unfinished! UGH! Anyway, the one above the boxes had a stamped tree
(from KSS Pine Trees), train (
from MFT's Cuddle Up Carter), and I drew a train track to go underneath the train. I think there was a teddy bear too from SU!. In the top box, there was just holly and berries, both from
KSS Holly & Mistletoe.
The bells are from
Kitchen Sink Stamps 3 Step Bells. I used red seam binding that my sweet friend
Karolyn sent to me!
When I look at this box, I start to think about that song, "...brown paper packages tied up w/ string, these are a few of my favorite things!" I took 3 small wooden blocks from my SU! block pile, and wrapped them up w/ brown paper from a paper bag. I used thread to tie them up, and glue dots to keep them all together! The tree is from a piece of 12x12 that I cut out w/ my exacto knife and adhered directly to the side wall, and popped out from the back wall. That "wallpaper" was pretty busy, and I wanted my tree to look more realistic.
This is my favorite box! I drew the fireplace, roaring fire, and mantel. I used that famous Martha punch for the greenery on the mantel, as well as the red wreath. I cut out stockings and glued white flocking on to make them look more like stockings. For the greenery on the mantel, I wanted it to look like white lights, so I added white/translucent beads.
The snow is falling! What large flakes there are! LOL! These lovely snowflakes are dies from
My Favorite Things and Nestabilities. I adhered them to fishing line so it is supposed to look like falling snow. And the flocking at the bottom is supposed to be already fallen snow.
I made the sled! Can you tell?! Doesn't it look awesome! I'm so proud of that sled! I added some white flocking so it looks like it was just out in the snow!
I didn't know what to do w/ this box, so I stamped a bunch of things and put them in here. All of these stamps belong to the set
Kitchen Sink Stamps Build A Garland. The music in the background is actually tissue tape from Tim Holtz.
And here's the second box I made.
I cut out the stocking, and made it like the ones in the other box. The ballet shoes and sucker are from an SU! set that has long since retired. Buttons, Bows and Twinkle Toes, if I'm not mistaken...
This is the holly and berries from
Kitchen Sink Stamps Holly & Mistletoe.
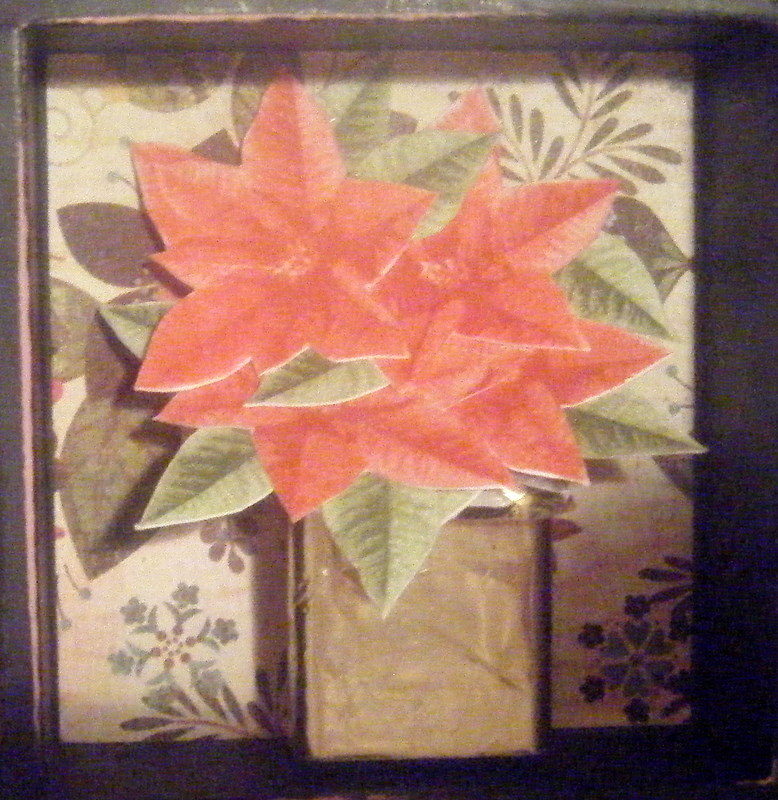
This is supposed to be a poinsetta plant. Does it look like it? The box is a wooden block from my SU! collection of blocks. I covered it in gold foil that is actually covering my real (fake) poinsettas that I have on my porch! Then I stamped the poinsettas from
Kitchen Sink Stamps 3 Step Poinsetta.
The greenery is from
Kitchen Sink Stamps Build A Garland. The lights are from a mini Christmas SU! set. I colored them w/ Copics. I made the two packages myself, and used seam binding ribbon for bows. I used wire to connect all the lights together. Does it look real?
The angel wings are actually butterfly wings turned upside down. I ran them through my xyron and applied white flocking. Then, I used a glue pen and went around the edges and applied 24k gold sparkly fluff to the edges and on the box so it looks like gold dust is following in the wake of the wings.
This last scene (I love creating scenes!) was actually the first box I did! I love the family decorating the tree! That stamp will be used A LOT! I just know it! Both that image and the sentiment are from Welcome Christmas by SU!. The teddy bear and tea set are from Buttons, Bows & Twinkle Toes from SU!. The greenery is from
Kitchen Sink Stamps Winter Cardinal and the bows are from
Kitchen Sink Stamps Build A Garland.
All the paper I used: Jovial by Basic Grey; Christmas by Me & My Big Ideas; & Evergreen by K. & Co. (old).
*Each link for Kitchen Sink Stamps goes directly to the set mentioned. The My Favorite Things are just to the main site. There's a glitch right now w/ the site.
Thanks for stopping by! Have a great day!