Saturday, March 30, 2013

Me at 33


Hi there! Today I would like to share with you a scrapbook page that I made for Swirlydoos!  The challenge was to create a scrapbook page of yourself!   Do you know how hard that is??!!!!  We had to make it monochromatic and we had to list our age in some way.  We also had to use black gesso or modeling paste w/ a stencil.  I used black gesso w/ a stencil.  Does that count?!  I actually did 2 on 1 stenciling!  I'll explain in a bit!

The pictures of me that I chose are from when we visited my grandparents last summer.  We actually made a complete circle in our travels!  We specifically planned it that way.  My grandfather suffered a stroke last February, and when we were visiting, he was in a nursing home.  Since that time, he has been moved to his home, where my grandmother and 2 wonderful caretakers take care of his every need.  Unfortunately, we haven't had a chance to go back down to visit.  Hopefully we can do that soon!  I miss him!  And my grandmother!

Here's my layout in its entirety:


 Below is the top half of my page, a closer up view, so to speak.  To first create the page, I printed and cut out my pictures.  I distressed them, and then layered them onto black c/s.  I took the piece of wood paper and distressed and sponged w/ black ink and laid out my pictures.  That's as far as I got at my scrapbooking weekend away!  I didn't have the net ribbon w/ me, nor the stamps, the gesso, the stencils, etc.....

This past week, I worked on this page, among the running I had to do all week!  I would paint, and then run to school.  Paint some more, then run to art lessons, and a different school!  Finally, this evening, I was able to sit down and FINISH the page!!!!!  Another scrapbook page DONE!  Whooo hooo!  :D

To create the background page, I started off w/ a Graphic 45 piece of paper and did a whitewash on it using white gesso and a bit of water to thin it out, so that the pattern would show through.  Then, I took my 11" x 14" plastic canvas (usually used for sewing projects!), and taped a swirly stencil on top of it.  I took a paint brush and black gesso and painted through it to create that speckled, almost cross stitch like pattern.  

Then, I die cut flowers from the Tattered Florals Die from Tim Holtz, and I used the negative to sponge some color onto the white washed background.  I used Vintage Photo ink.  Then I took Memento Black ink and sponged around the edges to make it look a bit more 3-D.


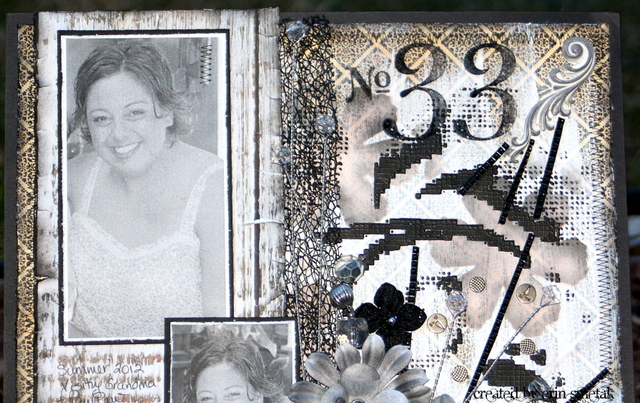
Below is the bottom half.  The Tattered Floral flower that I created is actually all white cardstock.  I laid it on
my spray board, and placed the plastic canvas over all of the flowers and sprayed Black/Gray Smooch Spray.  This creates the speckled look that matches my background.  I sponged the edges and put the flower together.  It's pinned together w/ a sparkly brad.  The other flowers are from SU!.  I sprayed them w/ Black/Gray Smooch Spray, and then spot sponged them w/ Memento Black ink.

I adhered black Petaloo flowers, floral sticks, and vintage metal findings, along w/ Black Prima Crystal sheets which are cut.  I only used the black ones...


To create the No. 33, I stamped it w/ Black StazOn onto acetate. 


Can you see the baubles peeking around the gray flowers?  That's actually a necklace!  I bought it at
Forever 21, and the day that I decided to wear it, the darn thing broke!  Well, I am my grandfather's 
granddaughter after all!  I didn't throw it away!  I knew I could use it for SOMETHING!  I stashed it away
with my other metal findings to use at a later date!
Lesson learned:  Don't throw jewelry away!  You can use it on your scrapbook pages!!!


Here's my ingredient list:

Paper: Graphic 45; Black, white c/s
Ink: Vintage Photo Distress Ink; Black StazOn; Memento Black; Black Smooch Spray; White Gesso;
       Black Gesso;
Stamps: Recollections Big One Double; Fiskars Punctuations
Embellishments: sewing machine; Prima Crystal Sheets (Vintage Chic Kit); floral sticks; SU! white flowers;
                        assorted rhinestone brads; metal findings (Vintage Chic Kit); black Petaloo flowers (past
                        Swirlydoos kit); acetate; black net ribbon (past Swirlydoos kit); Swirly stencil (The Crafter's
                        Workshop); plastic canvas; Black Smooch Spray; Tattered Floral die (Tim Holtz);
                         Forever 21 necklace

Have a great day!

Friday, March 22, 2013

eTeam Pick: Corregated Paper!


 Welcome to the March eTeam Picks challenge. The eTeam Picks Challenge is all about inspiration and having fun! During each challenge one of the eTeam members will share a topic, word, technique, sketch, or product that will become the foundation for your creation. This challenge is all about mixing it up and just enjoying the creative process... anything goes! We want to see your work and hear about your inspiration. All of those who play along with our challenge will be entered into a prize drawing for a $15.00 gift certificate to the eclectic Paperie store. Our host this month is the lovely Bonnie Irvine! I'd like you to add something corrugated to your project, whether it's corrugated cardstock or cardboard from a box...whatever and however you want to get it in there.

This week we celebrated my husband's birthday.  He already purchased his own birthday gift, so all I had to do was make him a card, and I couldn't even do that on time!!!  My poor hubby!  Well, I finally finished his card and will give it to him when he comes home from work!

Here's the front.  I used pieces of corregated cardboard for the challenge.  I peeled off the covering to show the mountains and valleys that IS corregation.  I applied some gesso, and sprayed it with Gold Lame` spray and sponged Onyx Black ink all around it and over some of the mountains.  I tore and distressed some paper for different layers.  Added a pocket watch to the top w/ some fussy cutting w/ my exacto knife.
I added some game spinners or clock works from Tim Holtz, and stamped the alarm clock from his Mini Blueprints 4.


 This is the inside.  I decided to continue the corregated cardboard inside, so I made that my journaling area.  I only peeled off the corners and distressed it just like the one on the outside.  I wrote my message on there, and attached everything to the inside.  I stamped Tim's clocks on tissue paper again, and fussy cut a clock for the bottom corner.  I distressed the polka dot paper, and I was done!


Here are the ingredients for my card:
Paper:  Bo Bunny 12" Timepiece; Basic Grey Basics Docket; Prima Printery Coll. Pressman and Page Four;
           black c/s; corregated cardboard; tissue paper
Stamps: Mini Blueprints 4
Embellishments: white gesso, Gold Lame` spray by Heidi Swapp; burlap from Swirlydoos; game spinners &
                         gears from Tim Holtz; Onyx Black ink

Have a wonderful weekend!

Saturday, March 16, 2013

March Round Robin Cards challenge!

Hello there!  Today I would like to share w/ you a card I made for Swirlydoos Round Robin March Challenge!  The requirements were to obviously lift from the person before you, and then create a sliding element, use a frame, and use metal tape.  Well, I didn't use the metal tape, but I DID use a frame and created a sliding element!

I lifted the rounded shape of the card and scalloped layer from the person before me.
Here's what I created!


 This is the inside of the card before I put it together.  You can see the card base and top base w/ spacer tape (I have no idea what the tape is REALLY called!), and then the ribbon layer (pencil marks; hadn't stamped them yet) and the top layer w/ frame attached.


And the rest of the pictures were just so you could see the different colors I used for the Awareness Ribbons.  When I was researching what colors to use, I found that there are SO MANY different ribbons!  How sad!!!!

The top panel of my card has flowers that coordinate w/ the colors of Awareness Ribbons that I stamped.
The Awareness Ribbons are from Kitchen Sink Stamps Ribbons W/ A Cause.
I used Swirlydoos flowers from previous kits, as well as paper from a past kit.  The background paper is from Kaisercraft Periwinkle Collection.
I used Spellbinders Circle and Scallop Circle dies.
The stickers to create the sentiment "love & support" are actually from this month's Swirlydoos kit from Prima.

To create each ribbon, here are my color recipes:
Red: 1. Real Red, 2. Poppy Parade, 3. Cherry Cobbler
Lime Green: 1. & 2. Green Galore; 3. Gable Green
Pink: 1. Pretty In Pink; 2. Regal Rose; 3. Melon Mambo
Purple: 1. Almost Amethyst; 2. Wisteria Wonder; 3. Elegant Eggplant
Orange: 1. Peach Parfait; 2. Pumpkin Pie; 3. Really Rust
Yellow: 1. Daffodil Delight; 2. Crushed Curry; 3. More Mustard

Have a wonderful day!!!

Tuesday, March 12, 2013

Round Robin March Scrapbook Page

I am loving participating in the Swirlydoos Round Robin challenge!  It forces me to work on a page a month!  I'm really getting into it and I LOVE IT!  The freedom to pick whatever genre I want is SO liberating!  I think working in order would burn me out!

Here we are with another page!  This one features my two older kids back in 2007 (like that was SO long ago!) and we were visiting Phipps Conservatory.  I LOVE going to Phipps!  There are SO many beautiful flowers that are artfully arranged.  They have butterflies in a couple rooms, water features, and different types of sculptures.  It's so peaceful and relaxing to walk through!

I had SO many ideas for this page, but time was against me as well as the challenge requirements, (I missed the deadline thinking mine wasn't due until THIS coming weekend.)  :(  The requirements were to use burlap, seed packets and real sticks from your backyard.  I used the first two, and wasn't venturing outside for the third!


Below is a closeup of the "seed packet" I created.


 Below is a picture with the flash off of my camera.  This page in real life is NOT as limey green as it's portrayed here.  It's more of a mossy green.


Here are the ingredients:

Paper: white 12x12; Prima Firefly Coll.; white c/s; Glitz French Kiss (fence); acrylic (what each letter is stamped on for banner)
Ink: StazOn Pink; Regal Rose; Melon Mambo; Rich Razzleberry; Blushing Bride; Forest Moss; Peeled Paint; Crushed Olive; Daffodil Delight; Dusty Concord
Stamps: Kitchen Sink Stamps: Multi Step Tulip Garden & Multi Step Seed Packet
Embellishments: Tim Holtz Fence Die (really a paper rosette strip die); My Favorite Things Banner Die-namics; stencil that was hand cut, along w/ tulips above each banner; flowers from assorted kits from Swirlydoos, burlap from assorted kits from Swirlydoos

Have a great day and Happy Spring!  It's right around the corner!!!!

Thursday, March 7, 2013

Home Sweet Home


 Hi there!  Today the eclectic Paperie team has been challenged to work with fabric!  Our lovely host this month is Micki!
The Get Altered Challenge is held on the first Thursday of each month and each challenge is an opportunity for you to be inspired by one of our eTeam’s creations, and to share your work, and be entered into our challenge prize drawing!  Head over to the eP blog for more inspiration and to post your fabulous fabric creation!


Well, when Micki first issued this challenge, I was NERVOUS!  If you know me personally, you know that I am NEVER nervous!  But I was really unsure about what I could do with fabric!  I purposefully stay away from fabric, because it could become another addiction like paper, ink, mixed media, and stamps are now!  LOL!  My husband would just roll his eyes if I declared I was going to start working with fabric!  Haha!


Needless to say, and despite my nervousness, this project came together pretty quickly!  I started and finished in one day, so bonus points for me! 


I have been seeing sewing hoops in projects recently, and wanted to try my hand with those, so I purchased 3, all different sizes.  (One just isn't enough!)  Then, I found some fabric quarters, which I liked because they are better than having yards cut and then not using them!  These quarters are like little tastes of fabric!


I actually used 3 types of fabric on this project.  The blue background on each hoop (which started out white and then sprayed blue w/ Smooch spray) is from one of the quarters, then I used green felt for the "grass" and white felt for the fence and clouds; and lastly, I have lace inside the house adorning all of the windows!

Here is the project in its entirety:


 This is a top view of the project.  You can see the roof of the house, the tree and swing, etc.


This is a closeup view of the house.  I actually created a 2-5-7-10 box (that originated from Splitcoaststampers.com), and then changed the measurements to fit inside the smaller hoop. With my Tim Holtz ruler, I drew all of the windows, shutters and door.  I went back w/ a Black Jellyroll Pen to bring it to life.
I cut out all of the windows w/ my go-to tool, my exacto knife.  I adhered lace to the inside of the house, and then closed it up.  The roof is just a piece of chocolate chip c/s that I folded in half and then embossed w/ the Bricked folder from Tim Holtz.  I wanted it to look like shingles, and out of all of the folders that I have, this was the closest.  I also added a gingerbread-ish look to the top w/ the 3 scrolls.  I cut each one individually and glued them.  I use 3 In 1 glue, and there's nothing holding them up except the glue at the top of each scroll!  That stuff is like cement!

I played around w/ making a box for the swing, and finally it worked.  There are no measurements.  It was midnight, and I was tired!  I have the hemp twine tied inside the box and threaded through the tree.

Speaking of the tree, the trunk is just a piece of chocolate chip c/s that I embossed w/ Weathered (same thing for the swing!) from Tim Holtz, and then rolled and glued.  I might have used redline tape actually....
To keep the tree in place, I have a pin that I glued the head to the inside of the trunk and pushed it into the felt. 


For the felt, I made a pillow, and then I pinched the edges inside the hoop for a clean look.  I took some excess fabric from the quarter and folded it up, and then rolled the green felt around it and adhered w/ redline tape.  The flowers are all from my stash, and the stepping stones are actually from a necklace!  I took it apart, and have all of the pieces in my little boxes of embellishments for future use!  These came in handy!


You can't see the clouds very well, but I hand sewed them onto the fabric instead of using glue.  I did glue the fence bottoms... 

That's it!  I hope that I have inspired you to create something out of fabric!  I would love to see your creations!

Have a wonderful day!

Wednesday, March 6, 2013

Hexagon Rain Clouds

Hi there!  I am going to warn you, this project is a bit artistic and out of my normal realm of cards and scrapbook pages.

Recently, I took a ride to Michael's, and while perusing the aisles, I found watercolor paints in a tin.  I picked it up and after looking at them today after I cleaned up my stamp desk, I wanted to see what I could create w/ them!

Here's the finished product!


To create this page, here's what I did:
1.  I took a piece of watercolor paper and painted it blue w/ blue watercolor paint and a little water.
2.  I took yellow paint and water and created the petals of the flowers.
3.  I took black paint and painted the centers.
4.  I took blue and yellow and made green because there wasn't a green in the tin!  I painted the stems and leaves and grass on the bottom.
5.  I took a black jellyroll pen and outlined the flowers, stems and leaves.
6.  I took my Hexagon Grunge stencil from Donna Downey (you can purchase at eclectic Paperie!) and w/ white and blue paint painted a line of hexagons across the page.
7.  Then I took some of the Hexagon dies from MFT and used the positives and negatives of the die above and below the painted line.  I painted the ones above a darker blue, and the ones below a lighter blue.  I added white to highlight  and I mixed black and white paint to make a gray and used that as shadows.
8.  I used my pen and outlined the "cloud" above the flowers.  I used the stencil and made actual hexagons for "raindrops".  I wrote a message on the left side set of raindrops:  "Don't let rain clouds ruin your special day!"
9.  I adhered it to a page in my journal and that's it!

Have a wonderful day!

Handmade Gift Basket


Hi there!  Today I would like to share w/ you a gift set that I made for a friend of mine who's school that she works and her children attend are having a gala fundraiser.  This gift basket is going as a silent auction item!

I used Kitchen Sink Stamps because they are the most realistic stamps that I own when it comes to flowers!
I even created some new color recipes too!

First we have the Rose!  My all time favorite!  I use this set from Hearts & Roses constantly!


 Next up we have Lilies!  I wanted a different color than purple.  I always make them purple!  I found a pretty picture of yellow/orange/deep red lilies and tried to duplicate it!


Here we have the beautiful zinnia!  I absolutely LOVE how these came out!  So vibrant!


Here are my lilacs!  Another go-to set!


And lastly, tulips.  If you ever stamp w/ Kitchen Sink Stamps, you will know what I'm talking about when I say how exciting it is when the image emerges when you have the right color combination and all of the layers are stamped exactly right!  It's like when the stars align!  That's how I felt w/ these tulips!  I wanted to create a field of tulips.  I think I achieved my goal!  Rather, my vision!  The two tulips in the front are the largest, and then the three in the back are smaller.  Kind of like an illusion!


I found this metal basket? at Michael's the other day, and thought it would be perfect!  I wanted to decorate it like I have been doing w/ my scrapbook pages lately, but sometimes less is more.  So, I simply covered the top w/ lace and a few ribbons and pretty bow.


Above is a full on view, where below is kind of on top of the basket so that you can see all of the sets.  I made 5 sets of 4 cards each.  Each card measures 3" x 3" w/ matching sized envelopes, also found at Michael's. 


And here it's all wrapped up and ready for auction!


Have a lovely day!

Monday, March 4, 2013

Hexagon Celebration!

Hi there!  It's my day over on the eclectic Paperie blog!

Here's a sneak peek as to what I created for today!


Head on over to the eP blog and check it out!