Sunday, September 25, 2011

Swirlyhues First Storyboard Challenge!

Hi there!  Yes, it's been a while!  I have hit a creative funk, or brick wall, and have not really been crafty in quite some time.  This weekend, though, I think I finally pulled myself out of it!  I was invited to join a new group of some awesome and fun ladies that gather at Archivers in OH!  What a fun day that was!  I didn't want to bring cards to work on, so I brought all of my supplies to create a scrapbook page for Swirlydoos FIRST Swirlyhues Challenge!  Anyone can enter!  You don't have to be a subscriber!  Although, why wouldn't you?  The products in the kits are amazing!  I get excited every time I get my click 'n ship email notification!!!

Anyway, on to the scrapbook page!

The rules for this challenge:  Follow the color scheme, follow the sketch, and use a tutorial that is posted on their website.  The tutorial I used was Emboss Resist.  I embossed swirls on all of the strips of kraft paper.  Then I took my Tattered Angels Glimmer Mists and sprayed all over the strips.  And then I took my Smooch ink and highlighted the swirls. 

 This is the whole page!
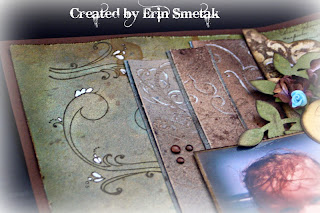
 This is a shot of the emboss resist on the strips of paper.  For the swirls on the background paper, I cut out the swirl on another piece of paper, and laid it down and sprayed over top of it.  I took the paper away and then stamped the swirl on top of the ghost image.  I added Smooch to the little loops to add detail and contrast.
This is the bottom.  Lots of detail here!

Details:
Paper: Et Cetera Ledger - Bo Bunny; Kraft, So Saffron, Baja Breeze
Ink: Moonlight, Tattered Leather, Olive Vine, Gingerbread - all Tattered Angels Glimmer Mist
      Walnut Stain, Frayed Burlap, & Brushed Corduroy - T.H. Ranger Distress Ink ~ All along the edges of each piece of paper
Embellishments:  French Flourish - wooden border at the bottom interlaced w/ assorted ribbon; UTEE, Versamark - embossing elements; brown brads; circle punch; Prima Flowers; Smooch ink - Turquoise; assorted flourish stamp; T.H. Distressing Tool; Zva Creatives rhinestone flourish; Turning a New Leaf die - PTI

Sunday, September 4, 2011

"Time" for a change!

Last Christmas, I received a clock similar to this one:


I am a substitute player for my mom's Bunco group, and the subs get to come to the Christmas parties and end of year parties.  It's a White Elephant party for Christmas, and one of the ladies had a clock like this in her garage that she wrapped up and gave!  I was lucky enough to receive it, and knew right away that I could re-purpose it!  This clock that I'm showing you is a lot nicer than the one that I got!  LOL!  It had the yellow plastic around it, but in the middle it was a picture of some advertisement for a pharmaceutical drug!  Um, yeah, I really want to hang THAT up in my house!  LOL!

It has sat on my desk all year, just waiting.  Well, I had some time on my hands this week, and I decided to tackle it!

Here is the result!


So, what did I do?!  Here are the details:

I took the clock completely apart, and measured the inside where the numbers are.  I took a piece of white 12 x 12 c/s and drew a circle around the clear part that goes inside and hugs the plastic.  Then, I took Antique Linen and Tea Dye from Tim Holtz and w/ my sponge applicator, sponged around the edges to give it an aged look.  I sponged Choc. Chip all around the edges to finish it. 

For the numbers, I took two different sets: Recollections Big One Double for the large numbers, and Inkadinkado's Somerset Alpha. for the smaller numbers.  The ink is Brilliance Pearlescent Chocolate.

For the stamps in the middle, I used all Kitchen Sink Stamps: Multi Step Ivy for the ivy behind the fruit; Multi Step Peach; Multi Step Berries; and 3 Step School Days for the apple.

For the yellow plastic:  This was hard!  The first time around, I sprayed the whole thing white.  Then, I took Tim Holtz's Picket Fence Crackle Paint and slathered it all over.  Once it dried, it took away the paint and showed the yellow!  Yikes!  SOoooo, I had to start all over again.  I sprayed it once again w/ white.  Once that was dry, I sprayed sealer all over it.  I let that dry.  Then, I put 2 coats of the Picket Fence Crackle paint on.  Once that was dry, I sprayed a little, ok, a lot of Tattered Angels Tattered Leather Glimmer Mist.  Once that was dry, I once again sprayed a sealer and let everything dry.  And thus, you have aged plastic!  LOL!

I took my other plain clock down, and put this one up!  OMG, I LOVE IT!  My family even loves it!

Do you have something in your stash ready for re-purposing?!  Now would be a GREAT time to dig it out and work on it!  Have fun!