Tuesday, June 28, 2011

Happy Birthday to my Mom!

Today is my mom's birthday!  AND my daughter, Olivia's!  How awesome that my daughter was born on her grandmother's birthday!


I wanted to participate in My Favorite Things' weekly sketch, but....I was too late.  :(  This week has been so crazy w/ us celebrating all 3 kids' birthdays on Sunday at a local park, and then going to a kids theme park the next day w/ friends.  

I went online this afternoon to find out the deadline for this week's sketch, thinking that it would be 10pm, and sadly discovered that it was 12pm.  Darn it!  It was already 2pm when I checked! 

But, I had to make a card for my mom, anyway, so the sketch still worked for me!  I opened up a new pack of paper from a stack I got when attending Stamping Around Ohio called Circa 1934 by Cosmo Cricket.  What a fun stack!!!

I softened the picture because the metallic on the bowl made the picture so bright!  

Have a wonderful day!

Friday, June 24, 2011

THE Farm Book!

I have taken on a pretty large project over these last two months!  And I am here now to say that it's done!  Whoo hooo!!!  Do the happy dance!!!!!!!  It was a pretty daunting task, I do have to say!  I was asked to create a scrapbook for a baby nursery that is a farm theme!  And it should have gotten to the baby BEFORE the baby was born.  But, since life has a way of interrupting even the best of intentions, well.....it's a bit late!  But, still within the month he was born, so not TOO bad.  But still.  Not quite good enough. 

Anyway, it's done!  And I am VERY proud of the way it turned out!  I just hope the mother who will be filling it up w/ baby pictures will love it as much as I do!  I mailed it off today, and I wanted to keep it for myself! 

 The project, when looking at the whole picture, should have been easy.  Create a scrapbook, farm themed, for a baby.  There aren't any pictures, because the darling baby wasn't born yet.  And leave pockets throughout for advice cards to slide in.  Ok, easy peasy, right?!  Well, when you're Erin Smetak, that's not the case!  I don't do easy.  And I don't do fast.  And I don't do sloppy or simple.  I take time to research the project, I pay attention to detail, I'm all about color combos, and I like to work outside the box. 
That being said, I had an absolute BLAST working on this book!  I drew quite a few things free hand, and was pleased as punch w/ the results!  I used my Cricut A LOT!  And lots of paper!  Lots and lots and lots of paper! 

Ok, let's get on w/ the show!  Just a warning:  This is a LOOOONNNGGGG post!

 The cover!
 Page 1!  Why not start out w/ cows in the pasture?  And a sweet message to the recipient!
 Pages 2 & 3!  The farm! 
Page 2:  I found a picture of a waving OH flag, and printed it out and attached to a flag pole that I made and colored.  The chickens and fence were cut w/ my Cricut.  The green panel is for a 4x6 picture.  I have these on every double page layout, just so you know...  The clouds I drew, cut out and sponged.  The grass was sewn along the edges for some detail.
 Page 3!  I drew (w/ my ruler) this silo.  Behind the silo is a hidden pocket for advice cards!  I made the sign using Spellbinders dies.  I drew the chickens and wrote the welcome message.  The fence was cut w/ the Cricut.  I sewed the edge of the grass on this page too.  To match.  And the clouds are the same as the first page, and will be the same in all upcoming pages!
 Page 4:  Who doesn't like pigs?!  Especially nice and clean ones?!  That's a rarity, I'm sure!  The heading, so to speak, is made into a swirl to mimic the shape of a pig's tail!  I wrote, "This little piggy went to market, this little piggy stayed home...."  I layered it w/ a scallop circle cut on my Cricut, along w/ those cute piggies, and then created another pocket!
 Page 5: And here we have some very dirty piggies!  I reversed the c/s when cutting the piggies and put Crystal Effects (liquid glue from SU!) that once dried, it gives off a nice shine!  I drew the flowers along the back edge of the muddy pond and colored w/ Copics.  The fence was cut w/ the Cricut.
 The double page!
 And the closeup of those bad little piggies swimming in the mud!!!
 Here's page 6 w/ rows of corn stalks ready for picking!  When brainstorming what each page would be featuring, I HAD to add corn to the list!  What's a farm book without it?!The corn stalks were all cut w/ my Cricut!  I tore Chocolate Chip cardstock and sponged the edges to make it look like it was just watered or it had just rained.
 Page 7 features a cob of corn (hand drawn and colored w/ copics) and the title for the layout cut w/ my Cricut.  The wonderful thing about the internet is that I found free fonts to add to my collection and was able to download/upload them to my cutting software and what you see above is how that idea turned out!  LOVE IT!
 Pages 6 & 7 double page layout!
 Page 8 we travel to the barn!  This barn is one of a kind, as it was hand drawn and colored w/ Copics.  The hay bales and barrel of apples are courtesy of Kitchen Sink Stamps.  The horses are from My Favorite Things.  The "B" stands for the last name of the family receiving this, and "F" for Farm!  The chicken in her nest at the top of the page is cut from my Cricut.
 Page 9 continues the horse theme w/ a great quote that I found online!  I used the Bleeding Cowboys font for this.
 
 Pages 8 & 9 double page layout.
 Page 10 brings us back out to the field toiling the soil!  When I created these pages, I felt like conveying the message, preparing the soil like you're preparing your home for a new baby!  However, I just couldn't make it work.  So, I'm stating that here on my blog!  Haha!
 For page 11, I mimicked the background paper and created large flowers grown from the newly toiled soil where the recipient can include circle pictures in the middles of the flowers!  Oh, the tractors were cut w/ my Cricut!
 Pages 10 & 11 double page layout.
 Page 12  we are grazing w/ the sheep!  The sheep and windmill were cut w/ the Cricut.  The grass was die cut using my My Favorite Things grass die namics.  The sentiment was die cut using Spellbinders dies.
 Here's a closeup of the quote.  I found this quote, which was quite lengthy, and tweaked it and made it my own. 
 Page 13 I wanted to use a LARGE sheep to drive that sheep theme home!  Think I succeeded?!  LOL!  I cut it out w/ my Cricut, which was nice, because this same sheep is what I used on the page before, I was just able to make it larger!  I LOVE that versatility!  I stenciled the Baaa! and then created a talking bubble and cut it out.
 Pages 12 & 13 double page layout.
 Page 14 is boring!  I know, I dropped the ball here!  But, I just wanted at least ONE page that didn't have anything other than a picture here!  I found this shape that I cut w/ Marina Mist cardstock, online, and thought it would be perfect as a layer behind the picture!
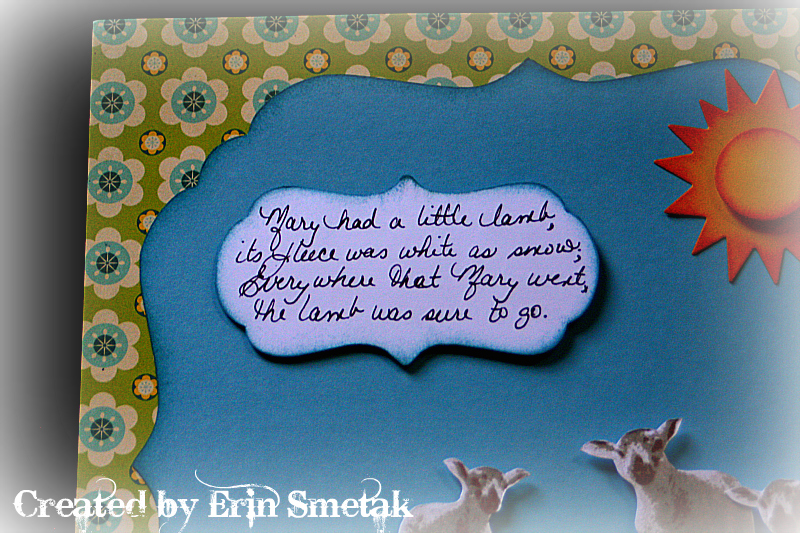
 Page 15 is a little more lively!  But not much!  LOL!  I used the same shape, w/ the same Marina Mist c/s and used that to create my little scene!  The lambs shown here are from Kitchen Sink Stamps.  The sun is a My Favorite Things Die namics, as well as the sentiment panel.  The grass was hand cut, and I sewed the green beads to the bottom to add a little detail.  It looks like food for the lambs, right?!  I did a little research on lambs, to get the coloring and find out a few facts, and I learned that they like to eat grain, and grass.  Well, brown beads just didn't look right, so I went w/ green!
 Here's a closeup of the sentiment panel.  I wrote out the first stanza of "Mary Had a Little Lamb".
 Pages 14 & 15 double page layout.
 Page 16 is going in a completely different direction.  I really wanted to incorporate some sort of flower in this book.  I decided on sunflowers, because they are mainly grown in fields in the midwest.  I know Kansas is the Sunflower State, but, why not have them in OH?!  The sunflowers are from Kitchen Sink Stamps.  The tag w/ a sun quote was cut w/ the Cricut after printing the quote out.  I sponged the background to make it look like a harvest sky.  I wrapped rafia into a bow and around the page.
 Here's a closeup of the quote and a sunflower.
 Page 17 continues the fall theme w/ pumpkins and fall leaves!  I drew and cut out the tree, and then embossed it w/ a woodgrain embossing folder from Tim Holtz.  The grass is the My Favorite Things Dienamics.  The pumpkins are from Kitchen Sink Stamps.  I sponged the background to match the opposite page.  The leaves are a Martha Stewart oak leaf punch.  I sponged choc. chip ink around the edges, along w/ the tree to highlight the embossing.
 Pages 16 & 17 double page layout.

 Page 18 I bring another animal to the book.  Sweet little rabbits!  What a cute little family they make!  Just like the family who is receiving this book!  The rabbits and grass are from Kitchen Sink Stamps!
 Page 19 I made a little plate of vegetables!  The carrots are hand drawn, and colored w/ Copics.  The lettuce and tomatoes are from Kitchen Sink Stamps!  They won't be released until next month!  You should have come to Stamping Around OH!  You could have gotten them a month early!  The peas are a 1 3/8" SU! punch, and sponged.  The pod is drawn to fit the peas, and sponged as well.  The ladybug is cut w/ the Cricut.
 Here's a closeup of the vegetables and quote from Shel Silverstein!  I wanted to end the book w/ something humorous!
 Pages 18 & 19 double page layout.

 Page 20!  The last page in the book!  I made this SUPER simple so that there's LOTS of room to journal!  Since I didn't leave a whole lot of room to journal throughout the book, they can journal at the end.  The gardener is from Can Ya Dig It WTG from My Favorite Things, along w/ the new plants!  I drew a line of soil for the plants to have a base.  I went w/ this image of her planting new plants, because to me, when you have a baby, you're planting new life, just like she's planting new plants!
Here's a close up of the bottom!

Thanks for traveling through this farm w/ me!

It has been a joy to work on this book!

Monday, June 20, 2011

Stamping Around OH!!!

Oh my gosh, what a fun weekend I had!!!!  My friend Wendy and I headed to Smithville, OH for Stamping Around Ohio!  We stopped in Akron at Archivers, Hobby Lobby, and World Market before heading to our destination!

All day Friday was all about Kitchen Sink Stamps!  If you follow my blog and are a regular reader, you know that I LOVE my KSS stamps!  The 3-D effect of flowers, fruit and animals {among other things} are just second to none!  I have such fun w/ these stamps and really stretch them to fit what I'm working on.  They don't just adorn my cards, but, also my recipe boxes, altered gifts, and scrapbook pages!  We received and worked w/ 4 new sets that won't be released until July!  SO fun to work w/ sneak peeks!  All I have to say is, you should have been there!  The best part about this?  I got to meet Maria Colosimo!  The OWNER of KSS!!!  Whooo hoo!!!!  What a sweetheart she is!  She is every bit as wonderful in person as she is online!  I was able to stamp with her, and she is just awesome!  Meeting her totally made the trip!

 Here's Maria and I on Friday!
 And here's Maria, my very good friend Wendy, and I on Saturday before Maria had to hop on a plane home!

Then, on Friday night, and all day Saturday, we participated in Stamping Around!  Tammy Hershberger was kind enough to open her store where she works, and let us all stamp and shop all weekend!
Tammy taught a class on Friday evening, and then Saturday, Maria taught one more class, and then Julie Masse, who is the co-founder of Stamping Around, taught a class.  Then Barbara Anders and Christina Fischer each taught a class!
 Here's Christina and I!
And here's Barbara and I!

I had a blast w/ these ladies!  They are just so sweet!  They will actually be at CHA working the MFT booth this summer if you are planning on going!  You HAVE to stop and meet them and all the other MFT DT there!  They are ALL so nice and sweet and talented and awesome!

Wednesday, June 15, 2011

Retirement Splendor

Hi there!  Today I am sharing a card that I made last night for my husband's assistant principal that is retiring this summer.  I literally had to whip this card up last night, as he is giving her her gift today! 

Yesterday morning I had gone through the MFT Design Team's blogs for the Technique hop.  Each month they all do a different technique.  This month was using paint!  FUN!  I was SO inspired, I just knew that I needed to case/copy their designs and incorporate them onto my own cards.  I did that actually w/ Arlene Cuevos' card HERE.  To me, that just speaks of a beautifully tended garden with fun, whimsical little flowers and garden embellishments!  The card invites you in and makes you want to walk through her garden and smell all the wonderful smells of summer and flowers!

Of course, my interpretation isn't as whimsical or as inviting, but it adds a vintage touch and some elegance.


You can look at the fence that I cut out of chipboard and painted w/ Tim Holtz's Crackle Paint.

Here are the details!
Paper: Kraft/Crumb Cake c/s; My Mind's Eye Dreamy; pink dsp (unknown); chipboard, white c/s; Pretty in Pink c/s; Certainly Celery c/s
Ink: Tim Holtz Tea Dye Distressing Ink & Vintage Photo Distressing ink; Kraft/Crumb Cake ink
Stamps: Canvas b/g (SU!)
Embellishments: Tim Holtz Picket Fence Crackle Paint; MFT Dienamics: Rolled Rose, Dainty Doily; Spellbinders; lace; rhinestone swirls; sewing machine

Have a GREAT day!!!

Monday, June 6, 2011

My Personalized Notebook

I have started a new crusade!  My friend Janene started a group for couponers.  She invited me to join, and I have been learning all about the art of couponing and saving and I have to say, it's addicting!  I'm thinking that it's all in making lists of what you need, and when you need it, and learning the sales trends, and when to get things and when to wait.  Luckily for me, my wonderful husband has been doing this already pretty much since we've been married, or at least since we've had kids!  And now that I have finally seen the light, I have jumped on the bandwagon too!  And my husband couldn't be happier!  It's so nice to be a happy family!  :D

So, today I was perusing Splitcoast and I found on the MFT thread, the Guest Designer challenge.  Now, I've been participating in the sneak peeks for their upcoming release, but I lose track of when the guest designer challenges are and when things are due.  Well, I found that the challenge deadline was tonight at 10pm.  I wish that it would have been Pacific Time, but I still managed to get it in at 9:59pm EASTERN time!  I would have liked to have sewn around the edges, and prettied it up a bit.  But, after it drops into my purse, it becomes a warzone, and God help this little notebook cover!  Esp. when my little ones get in my purse!  Once they spy this, it suddenly will become theirs and disappear!  Or worse, they will grab a crayon and write all over it!  Oh the horrors!!!!!  ;)

Anyway, on to the project!

 This is the front cover as a whole.
 The inside, so you can see that I really am going to use this!  ;)

 Closeup of the top.
 Closeup of the middle.
And closeup of the bottom.

The MFT challenge was to personalize something.  It was either this or my coupon binder!  ;) That may be next!  Who knows!

Here's the details:
Paper: Kraft, Baja Breeze, Certainly Celery,white
Stamp Sets: MFT's Typewriter Alpha. & Who's That Harvesting Girl
Ink: Certainly Celery, Baja Breeze, Black Sparkle Spica pen, Creative Memories black journaling pen, Copics, Memento Black ink pad
Accessories and Embellishments:  Honeydew twine from The Twinery; Swiss Dots embossing folder; Decorative Doily Die-namics (MFT); Dainty Dots Die-namics (MFT); Banner Die-namics (MFT); Mini Banner Die-namics (MFT); Simply Scallops Die-namics (MFT); Grosgrain Die-namics (MFT); 3/4" circle punch (SU!); circle nestabilities.

Have a great day!

Thursday, June 2, 2011

Teacher Thank You Gift

Hi there!  Just to warn you, this will be a long post w/ lots of pictures!  Grab a drink and a comfy seat and settle in!

My son "graduated" from Kindergarten last night!  So exciting!!!  What a great year we had!  I am so thankful for the wonderful teacher that he had this year!  For his first official school year, it rocked!  His teacher just loved him, which, if you know him, that's easy to do!  And it made for a wonderful teacher/student relationship all throughout the year.  It's so amazing to see how far he has come in one year academically!  I am so proud of him!  But.... this post is not about him!  It's about his teacher!  I wanted to make her something really special, because she truly is a special, one of a kind, teacher.

I decided to make her an organizer for her desk.  As I was decorating it, I thought, well, this would look fantastic on MY desk!  As I LOVE all things vintage!  And I'm not sure if his teacher would appreciate the vintage feel.  Oh well!  I hope she likes it!

I took 3 Papertrey Ink stamp mailers (for lack of a better word) that my friend Wendy gave to me, and I cut them to 3 different heights to achieve the look that I had in my head.

All of the paper that I used is from the Swirlydoos April kit Bella Volo.  I LOVE the Bo Bunny paper!!!  It was perfect, as it all matched!


 This is the first (back) layer.  I created a notepad holder to place inside.
 This is the cover of the note pad holder.  I used Oval Nesties, letters from KSS, butterflies from SU Sizzlet, twill tape, lace, chipboard swirl, prima flower, rhinestones.


 This is the inside of the note pad holder.

 Here's a different look at the note pad holder.

 This is the next box, holding a set of note cards.

 And these are the note cards.  I created the background paper entirely.  I used these stamps to create the background:  Bliss (SU!), Tim Holtz Letter to Santa, KSS Letters From the Past, Inkadinkado Bold Damask, and Oval All (SU!).  I used the Martha butterfly punch, brown brads, MFT scallop die, lace, twill tape, buttons, and a quarter of a doily that I sponged brown.

  And the smallest box!  I decorated pens, and created a post it note holder for this box.  And then decorated the front w/ some small embellishments.

 Here's the front of the post it note holder.

 And the inside of the post it note holder.  I know, you can't tell what that is, right?!  ;)
 

 Here it is w/ the post it note holder tucked into the box.

 This is a closeup of the pens.  I just took strips of the paper that I used for the boxes, and rolled them up, and stuck them in each pen!

 Here's the finished product!


This is just to show in relation to other things on my desk.                

            
And the side of the boxes.  I decided to leave them clear so that she can't lose anything and it's easy to look inside!

That's it!  This project took me about 2 months to complete as I have had other things to work on in between.  I would work on a little bit at a time, and it's finally done!  Just in time too! As the end of school is Friday!  Hahaha, nothing like waiting until the last minute!