Saturday, August 31, 2013

When the party's over

Hi there!  Today I would like to share with you a journal page that I created this morning!  I started last night, and I ruined the page because I didn't let my inks dry completely.  So, I started fresh this morning, and it just took on a new and exciting look!  I'm glad I messed up last night!  :D

One of the current trends is dripping on your canvases, scrapbook pages and journals.  I had yet to try this, and thought that it would be cool here.  When I sprayed all of the different colors initially, I thought that this could be a fun birthday themed page.  Then, I did the dripping thing, and thought about when the party is over.  You're a little sad when everyone leaves after having such a great time!  Well, I always feel this way!  LOL!


Here's how I made the page:
1.  Prep your page w/ Matte Medium, and let it dry completely. 
2.  W/ several different ink sprays, spray a background, and before it dries, tilt your page up so that the colors drip.
3.  Dry everything and spray a sealant so that the colors don't rub off as you're working.  Let dry.
4.  Taking black gesso and the Mini Tiny Circles stencil, apply in a random pattern on your page.
5.  W/ my party decorations in the top L corner, I used Park Avenue Patterns from SU! w/ Onyx Black ink.  I went back in w/ a silver gel pen to add contrast.
6.  I flipped over my Mini Numbers Collage stencil and sprayed it w/ Black Marble Dylusions Spray.  Then, I pressed it randomly on the page.  This represents that this is a birthday celebration.
7.  I stamped several balloons (ingredients below), and adhered them so it looks like they have lost air and are just dragging by this point. 
8.  I stamped the girl, and paper pieced her.  Colored her w/ copics, and adhered her to the page and that's it!

Ingredients:
Paper: Melissa Frances Hope Chest; white c/s
Ink: Onyx Black (Versafine), Memento Black, black gesso
       Orange balloon: 1. Canteloupe, 2. Tangelo, 3. Potter's Clay, 4. Morocco  (all Memento)
       Yellow balloon: 1. Squeezed Lemonade (T.H. Distress Ink), 2. Dandelion (Memento), 3. Canteloupe 
                                 (Memento), 4. Mustard Seed (T.H. Distress Ink)
        Purple balloon: 1. Lulu Lavender, 2. Grape Jelly, 3. Elderberry (all Memento), 4. Imperial Purple 
                                 (Versafine)
        Blue balloon: 1. Summer Sky, 2. Danube Blue, 3. Majestic Blue (s.o.), 4. Paris Dusk (all Memento)
        Red balloon: 1. Worn Lipstick, 2. Festive Berries, 3. Barn Door, 4. Fired Brick (all T.H. Distress Ink)
        Pink balloon: 1. Spun Sugar (T.H. Distress Ink), 2. Angel Pink (2 x's) (Memento), 3. Picked
                                 Raspberry (T.H. Distress Ink), 4. Rose Bud (Memento)
         Green balloon: 1. Bundled Sage (T.H. Distress Ink), 2. Cottage Ivy (Memento), 3. Mowed Lawn,
                                 4. Pine Needles (both T.H. Distress Ink)

         Sprays used: Dirty Martini, London Blue, Bubblegum Pink, Pure Sunshine, Squeezed Orange, After
                              Midnight, Black Marble & Cherry Pie (all Dylusions sprays)

Copics used: E00 (face/skin); T1 & W-5 (skirt); Y32, E37, E57, & E49 (in that order) (hair)
Stamps:  Riley (Prima); Bunch O' Balloons (Kitchen Sink Stamps); Park Avenue Patterns (SU!)

Here are the links to the products that I used:
Dylusions Ink Sprays - eclecticPaperie
T.H. Distress inks - eclecticPaperie
Riley stamp - eclecticPaperie
Bunch O' Balloons - Kitchen Sink Stamps
Memento Inks (various sizes) - Kitchen Sink Stamps
Versafine Inks - Kitchen Sink Stamps

Have a terrific day!

Visiting Monticello

Hi there!  Wanted to share a scrapbook page that I made for a Swirlydoos challenge!  This one was by VickyA, using 2 new techniques that you've never used before!  This one page took about a week and a half to complete!  I had taken a Claudine Hellmuth class all about techniques, and one really grabbed me.  She created a crackle technique, but used Elmer's Glue and acrylic paint to create the crackle effect!  I couldn't wait to try it!  The other technique that I used, I came up w/ on my own.  I have never sprayed ink on a stencil, and then used it as a stamp.  So, those are my techniques!


You can see the leaf stencil in the background.  The crackle technique is on the circle behind the pictures. 

Ingredients used:
Paper: Splash of Color Cotswolds Coll.; Core'dinations c/s, white c/s
Ink:  Dirty Martini Dylusions spray; Faber-Castell artist pen (to outline all of the leaves); acrylic glaze; Barn Door & Iced Spruce Distress Inks (Ranger)
Embellishments: Prima tiles, Prima packaging as backgrounds for pics; Prima Decorative Wood Embellishment; Prima Vintage Trinkets; corner rounder; Climbing Vines stencil (TCW); PTI Turning A New Leaf die

Thanks for stopping by!  It's a sunny day here!  I hope there's sun wherever you are!

Friday, August 23, 2013

Altered Paint Brush!


Hello there!  Today I would like to share with you an altered challenge!  Alter a paint brush!!!  FUN!  Let me tell you!  I SO enjoyed this challenge that our wonderful team member Tracy chose for us!  Here's an excerpt from the eP blog!

Hello everyone, Tracy here today and I am soooo excited to be hosting the eTeam Picks Challenge this month. After much scratching of my head along with oohing and aaahing . . .  the theme I have chosen for you all is - Get your mixed media on with a Paintbrush as your focal point.

Make sure you go to the eP blog and check out the challenge!  All of the rules are listed there!

I decided to use my new Steampunk Spells paper by Graphic45!  I LOVE this stack!  I am going to have to order more before Halloween's over for sure!!!!  I made a Halloween decoration for my house w/ the paint brush!  Normally I have start to finish pictures, but I was in a zone, so I completely forgot to take pictures!  It was a messy adventure with Gel Medium!  That's all I've got to say!  LOL!

So, here is my paint brush as a whole.  I had SO much fun altering this!  


Here's the top (handle).  I added a chain that I threaded through several times to create different lengths.  I cut out a clock, and I used a square clock embellishment from my stash.  The skeleton was in the G45 stack, and I cut it out and sponged around the edges.  The frame was white, then I painted it w/ black Gesso, and then wiped some of it off w/ a baby wipe.  The nice thing about those is that if you wipe too much gesso off, just keep dabbing and you'll get a marble effect!  I sprayed it to seal it so that the paint doesn't wipe off.


And here the closeup of the bottom of the brush.  The bottles are from Tim Holtz.  The red one signifies hearts (cinnamon cookie decorations) and the white one has Gel Medium in it w/ pearls to signify eyeballs in goo.  I thought the gel medium would clear up, but it's staying white.  Darn it! 

The double double.... is cut from the G45 stack.  I discolored it w/ Wild Honey and Vintage Photo Distress Ink.

The bat is a cut out from the G45 stack as well.  The stick was found in my backyard and I sprayed it black.  The flowers are Heidi Swapp and the come uncolored.  I sprayed them w/ Lemon Zest, Dirty Martini & Black Marble Dylusions sprays.  Once dried, I sponged the edges of the petals w/ Black Soot Distress Ink.
The spiderweb was created free hand using String Gel from Liquitex.


That's it!  I hope that you like what you have seen today, and that I have inspired you to find an old paint brush and bring it back to life!  A new life that you would be proud to hang on your wall or door knob!

Have a lovely day!

Wednesday, August 14, 2013

Smile


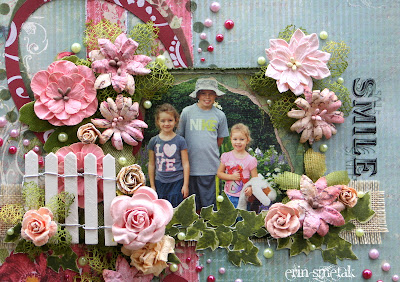
Hello!  Today I am sharing a scrapbook page that I created for a Swirlydoos challenge that is now open to the general public!  In the past, it's only been open to kit subscribers.  Why wouldn't you want to be a kit subscriber anyway, though?!  The kits are jam packed with gorgeous papers, amazing embellishments and fabulous inks, stamps, and other goodies!  How are you passing this up each month???!!!

Ok, back to the subject at hand!  In each kit, there is a piece of paper that has the month's sketch listed on it.  That is only one of many challenges on the forum that you can participate in.  I have never really made it my mission to do the sketch challenge until yesterday.  I just always said to myself that I would do it "later" or "another time".  Well, 2 years later, this is the first one I'm participating in!  I think I've waited long enough!  HELLO!

This month's kit is chock full of beautiful papers from IOD and Bo Bunny!  I just want to hoard these papers forever!  Pinks, ivory and green is the color scheme, with some blue tossed in. 
I pulled a bunch of embellishments and chose my paper and picture and got started!  Here's the finished product!


Here are some closeups:


Here are the ingredients for creating this page:
Paper:  IOD Paper - Costwold Manor Coll.; Purely Pomegranate c/s; Old Olive c/s
Ink: Old Olive (SU!); Pistachio (Memento); Peeled Paint (Ranger Distress); Olive Grove (Memento); Northern Pine (Memento); Frost White (Color Box)
Embellishments: white Faber-Castell Big Brush Pen; Petaloo Darjeeling Pink Wild Blossoms; Petaloo
        Textured Moss Green elements; fence from this month's kit; Plum, Lush and a green Kaisercraft Pearls;
        assorted rub-ons; burlap strip (from a previous kit); Kitchen Sink Stamps Ivy; Kitchen Sink Stamps
        Letters From the Past; swirly stencil (TCW); Shabby Chic Prima resin corners; swirl punch; Matte
        Medium for picture - this is cool!  It makes it look kind of instagramish!

Have a lovely day!

Friday, August 9, 2013

Spray Paint Art......kind of!

Hi there!  I have been enamored with spray paint art!  It is SO interesting how they can layer colors, and come out with something absolutely amazing!  Take a look at this video and see what I mean!

So, I know that I don't have spray paints in my arsenal.  I'm shocked too!  LOL!  But, I have a bunch of Dylusions Ink Sprays, so I put them to work!

I created a page in my art journal.  First I prepared the page w/ Iridescent Medium by Liquitex (you can find it at Mike's) and let it dry.  Then I started spraying!  I first used Bubblegum Pink and Vibrant Turquiose.  Then, I put some lids on the page to create circles and kept spraying w/ Crushed Grape, Pure Sunshine, Dirty Martini and I added splashes of White Linen.

I sprayed some Heidi Swapp Tinsel Color Shine just to see how well it would show up.  Eh, not so much.  Bummer!  Then, I took my Faber-Castell Big Brush White Pen and drew around the circle to make it look more 3-D.  I sprayed some more White Linen, but there's something special about spray paint that lets you create 3-D images in crystal clear perfection!  But, if you're just going for blended and bleeding, then, buddy, I have achieved it!  Haha!


You can get the entire collection of Dylusions Ink Sprays by Ranger at eclecticPaperie!  Stop by today!
Have a super weekend!!!

Thursday, August 1, 2013

Family Game Time

Hi there!  Today I am sharing my project for eclectic Paperie's Get Altered Challenge!  Here's the deets:

The Get Altered Challenge is held on the first Thursday of each month and each challenge is an opportunity for you to be inspired by one of our eTeam’s creations. Today it's Bonnie's turn to host the challenge and we would love to see you incorporate games in your project. You can use game pieces, game cards, or even use a game board as your substrate, like we did.


What a fun challenge this was!  I looked through my house for games w/ lost pieces, or forgotten games altogether.  Not that we have a lot!  And the games that we have, my kids are still at the playing age, so we have things pretty organized, and no pieces lost.  Bummer for me!  Until I looked under the couch!  Jackpot!  We LOVE to play Disney's Scene It and Scene It 2.  However, we don't play the right way.  We just play the dvd portion of the game!  Not that we don't like boardgames, but we just like to play the dvd part better!  Plus, when I first opened the box, I didn't realize how the boardgame opened, and I broke one of the boards.  So, it was already compromised!

I took the box out, and took everything except the dvd's and went back to my craft room!  A page started to emerge as I laid things out.  Now all I needed were pictures!  I told my kids to get dressed, as they were still in their pajamas!  We are LAZY this summer!  ;D  I put the dvd in and once the game started, began taking pics of the kids answering the questions.  I couldn't leave them once I was satisfied w/ my pics!  So, I sat down and played a few rounds!
THEN I printed my pics and got to work!  Here's the finished result!


Products Used:
Black Soot Distress Ink
Cosmo Cricket: Sweet Disposition 
Tim Holtz Bigz Die: Picture Wheel


Thanks for stopping by!  And definitely check out what the rest of the design team is doing!  Take a chance and create something with your forgotten games and relive those fond memories of sitting around the kitchen table with your family playing games and laughing like crazy!