Thursday, July 4, 2013

'Bringing it' in a patriotic way

Hi there!  Today I would like to share with you a page that I created for today's special day, the 4th of July!!!!  Happy Birthday America!!!!!  What a true blessing it is to live in the United States!

The Get Altered Challenge is held on the first Thursday of each month and each challenge is an opportunity for you to be inspired by one our eTeam's creations.  With this month being  Mary-Ann's turn,  she chose to force you mixed media peeps into "Bringing it" (mixed media) to a layout.  WARNING:  this getting dirty thing is kinda addictive and catchy.  This layout girl is still a die-hard scrapper but has started to walk on the wild side! You HAVE to see what she created!!!  Her page ROCKS!

Here's my Mixed Media page for the Get Altered Challenge!


To create this page, I started with a plain piece of 12" x 12" Kraft paper and I painted Gesso to create a foundation.  I chose my pictures from our vacation last year when we visited Yorktown, Annapolis, Williamsburg, and Virginia Beach.  The pictures are from our day at Yorktown.  My husband and I are history fanatics, with Kevin being a former high school History teacher (he's a principal now), so we had a ball on our vacation that year!  Every year we try to go somewhere historical to not only feed our love of history but to teach our children about history and to appreciate our nation's historical events.

I was looking at the cannon picture, and I thought that it would be so cool to make it look like it fired a shot!  I took several of my sprays and created a "firing shot" by spraying at an angle. 

I sponged Tim's Barn Door Distress Ink w/  my Mini Distressed Chevron Stencil  on the opposite corners.  I also took my Mini Damask stencil and with some blue Smooch spray, created more background.


I added some corregated paper to create the flag in the top Left corner, as well as part of the frame around the pictures.  I added red paper from Authentique's Lovely stack to the background,  as well as Cosmo Cricket's letter correspondence paper inside the Sweet Disposition stack.

I sponged Tim Holtz's Distress Ink Walnut Stain around all the edges of the various papers.
I used Tim's 3-D Star Bright Bigz Die using the Sweet Disposition paper to create the star.  I swept a sponge with Tim's Salty Ocean Distress Ink to really make the dimension pop! 

To create the colors of the flag, I used white Gesso for the white layers, and Tim's Barn Door Distress Ink for the red.  I stamped the ink pad on my nonstick craft sheet, and then sprayed with water.  I took my paint brush, and painted in the creases.  I did the same thing with the blue square, which I used the Salty Ocean ink pad.  I used a white gel pen to draw the stars in a circle, which is how the flag looked in 1776.  I couldn't wait for the Salty Ocean paint to dry, so the stars aren't very bright!


Just wanted to show you my patriotic end table in my living room!  I created the American board recently, and still had it sitting out.  Pairing it with today's scrapbook page was genius!

Happy 4th of July to you and your families!

Thursday, June 6, 2013

Celebrate!


Hi there!  Today is the first Thursday of the month!  Which means that today is eclectic Paperie's Get Altered Challenge!!!  Our lovely hostess this month is Toni!  She challenged us, and is challenging YOU, to alter a spoon!  What a fun challenge this was!

Here are all the deets on the challenge! 
The Get Altered Challenge is about exploring your creative journey, about stepping outside of your comfort zone, experimenting with new products, and creating altered and mixed media art.  
We want to see your work and hear about your inspiration!  All of those who play along with our challenge will be entered into a prize drawing for a $15.00 gift certificate to the eclectic Paperie store.

So grab your supplies and play along!  Here are a few things to keep in mind for this challenge…

-You do not have to use products sold in the eP store…but we do love it when you do!

-Share a direct link to your creation, not just your blog, using the Linky Tools feature at the end of this post.  If, for any reason, the Linky Tools doesn’t cooperate, please add a link in the Comments section of the blog.

-When uploading to any online galleries, please use any of the following keywords; eP, eclectic Paperie or Get Altered Challenge. Link your creations to the eP blog.

-If you’d like to be considered as one of our featured projects and be entered into our prize drawing, please be sure to add your link before Midnight on the 18th of June.  The winner will be announced right before the eTeam Picks Challenge.
Ok!  Now that we have that important business out of the way, let's see what I came up with!

I was really impressed with Julie Masse's challenge to use gel medium with a photo transfer Visit Link Here, so I wanted to try that same technique on a spoon!   My cousin is an avid collector of all things, and was recently having a sale to get rid of quite a lot of it!  I asked if I could have all of her serving spoons!  I received a whole handful!  YAY!  Future spoon projects!!!  

To get started, I gesso'd my spoons (my original idea was to use 4 spoons, but they all didn't turn out as pretty as the first one did!) first with a paint brush, and then with a sponge for full coverage.


I stamped party stamps from Tim Holtz's Blueprints #4 onto very thin note pad paper.  I cut the images out, and adhered them on each spoon.  I pressed them down, and flattened all the air bubbles and let them dry.


Once dry, I took my fingers which I dripped in water, just like Julie shows in her Youtube video, and gently massaged the paper off the spoon.  This is what you are left with!


I sprayed them with red and blue sprays, and let them dry.  


Here's the final project:
I apologize for the glare!  I don't know what was going on w/ my camera!!!
I had started with this board for Memorial Day, and then my inspiration was sucked dry because I was too busy with school activities.  So, I let it sit in my stamp room until now!  I could finish it now!  I created a piece of cake out of paper using my Cricut, and embossed the blue panels with one of Tim Holtz's embossing folders.  I painted Gel Medium on the panels to make them look more like fondant.  I added a couple rosettes to the top for "whip cream", and I was done!  I made the stars out of Tim's 3-D Star Bright Bigz Die. 
 I cut strips to create a flag and attached them with Tim's little findings.  I die cut a film strip from Tim's Mini Film Strip.  I took pictures from a page in Midway from October Afternoon, previously sold in eP's store, and cut each one and placed inside each frame.

The AMERICA is die cut from Tim's Strip Alphabet Die and adhered w/ glue.
 Here are closeups of each section!


I hope that I have inspired you to create with us!  I look forward to seeing what fabulous creations you come up with using a spoon!
 
Have a great day!


Thursday, May 16, 2013

eP Picks: Gel Medium!


 Hi there!  Today is an eP Picks Challenge!!!!  Julie is our lovely hostess today!  She challenged us to use Gel Medium!  Head on over to the eP blog to see how SHE used it!  Amazing!

What IS Gel Medium?  Here's what Faber~Castell says: "Gel Medium is great for adding body and dimension to other mediums.  Use it to extend colors, add semi-gloss sheen, decoupage and for creating dimension as it will hold its form when it dries.  Try this semi-gloss, translucent medium with all your paper crafting and mixed media projects."

Well, Julie used it as an image transfer vehicle.  Some fellow eP teammates used it in a variety of ways!  You HAVE to check their blogs out!  Amazing!!!!  All links are at the bottom of Julie's post!

What did I do with Gel Medium?  Well, today I just used it as a sheen, more like a top coat, if you will.
I was inspired by eP's Guest Designer, Lynne Forsythe's post using an ATC.  So, I decided to make one too!  Of course, mine doesn't lie flat, and it's probably the wrong size for an ATC, but that's ok!  I'm not going to be sending it to anyone!

I received a fabulous box of goodies today, which I used in today's creation!  The full listing is at the bottom!


To create this ATC, I first took a piece of plain blueish paper from the Park Bench stack by Fancy Pants.  I took a floral piece of paper as well, and tore a piece to use on here.  I inked my brand spankin' new Tattered Chicken Wire stamp from Unity in Onyx Black ink.

Then, I took from the 50's Diner Gelato Collection: Aqua Dolce and Banana and just scribbled over the chicken wire to color it in a bit.  I colored Squid Ink all around the edges.  W/ a blender that comes in the pack, I blended the colors together so they weren't standing out, but faded into the background.  I also added Squid Ink to the bit of floral paper, and blended that in.

I adhered the floral paper to the chicken wire paper, and painted it with Gel Medium.  When you brush in up and down strokes, once dry, the gel medium takes on the look of wood!

Embellishments are just paper cut out and adhered!


I really tried to get a close up shot of the sheen, but my camera just wasn't going to work with me!

So, that means you need to try it yourself!  You can pick some up Gel Medium HERE!
Park Bench 6" x 6" pad
50's Diner Gelato Collection
Big White Brush Pen 
Chicken Wire Stamp

Have a great day!  Can't wait to see what YOU do with Gel Medium!!!
 

Sunday, May 12, 2013

Peeled String

Today I am showing you my abstract side!

It's rather hard for me to create simple pieces.  Take my scrapbook pages for example.  I love to make them 3-D.  Same with my cards!  It's so hard to mail them!  Haha!

So, when I started working on this canvas, and especially when I told myself it was done, it was SO hard to walk away!!!!  I feel like it needs more!

I was at Michaels today, and I wandered back to the art section (my newest favorite part of the store!), and I found String Gel!  It acts like honey when poured gently!  I bought it and couldn't wait to get it home to try it out!

Well, when I painted my canvas with clear gesso, I knew I wanted to incorporate the String Gel in some way.  I started with a few stencils and Tim Holtz Distress Ink Pads. Then, I wasn't happy with it, so I took a baby wipe and swiped it to blur everything.  Ok, liked the look, time to add the String Gel!

I grabbed a knife and after gathering a heap, I let it drip off of the knife while moving it across the page.  I continued doing this until I was satisfied with the drippings.  I let it dry (with the help of my embossing gun!  Can we say impatient?!), and actually took a nap (we had to get up super early to go to church this morning w/ my MIL).  Once it was dry, I sponged more Forest Moss Distress Ink over the entire canvas.

Then, I started to peel the String Gel off.  I used my exacto knife, and then after a while, I just used my nails and scraped it off.  That was a whole lot quicker!

I looked at it, and decided it need a LITTLE bit of color.  So, I used my Hexagon stencil from eclectic Paperie, with Dusty Concord Distress Ink.  I took another baby wipe and swiped the corners a bit to make that blur, and then I was done!

What do you think?  Abstract enough?!  LOL!


Have a lovely day!

Spread Your Wings!

Hi!  Today I would like to share with you a journal page that I finished creating earlier this weekend!  I am currently taking an online art class, and I wanted to participate again (life has been a bit crazy, so I haven't been able to participate much!).  I started laying paper down, and not really paying attention to what was on the paper.  Turns out, I was actually creating a theme!  Wings!  As you can see below, there is a plane, and fairies on my page.  As I was looking around my craft room, I spied some Paper Clay that I had purchased for the class, but hadn't opened yet, and tore into it!  I have some ideas on what I can create with this, but I'm going to work slowly towards sculpting.  I decided, after several failed attempts, to just make wings! 

I created the wings, and then, waited....and waited....and waited some more, for the clay to dry!  Finally, I couldn't wait any longer!!!!  I sprayed them w/ purple smooch spray.  Then, I took Black Gesso and filled in the creases that I made with a pencil point when I was initially creating the wings.  I painted some pink polka dots for flair.  Then, I took Glass Bead Gel and liberally painted on them to create some bubbly texture.  Then, I took Gloss Gel and painted that on top of the Glass Bead Gel.  Once it was dry, I glued them to the page!


 This is the page in its entirety.

To create the page, here are the steps I took:
1.  Choose and adhere your paper pieces.
2.  Mix White Gesso with water until desired lucidity and consistency, and paint over entire page.
3.  Take a baby wipe (or alcohol on a towel) and wipe away the gesso what you really want to have emerged.
4.  With acrylic paint and a stencil, start painting.  Take a Copic and create the 3-D effect. Highlight with Pitt Faber-Castell Black Pen.
5.  With a white gel pen, create highlights.
6.  Create wings with Paper Clay, and let dry.  Paint and adhere to page.

Here is a close up of the top of the page:
 Here's a close up of the bottom of the page:


Have an amazing day!

Wednesday, May 8, 2013

Wacky Wednesday!

Hi there!  Today I would just like to share with you a card I made for the teachers at Olivia's school.  I am co-chair of Teacher Appreciation/Hospitality this year.  And since I'm a crafty girl, I had to get my craftiness on!  I decorated each teacher's door (there are only 6 teachers, so it wasn't a LOT of work, but still took plenty of time!), and w/ the help of the other co-chair, came up w/ a menu and gift ideas for the teachers throughout the week!  It's a fun week, and I'm so excited that the teachers love what we are doing for them!  It makes all the hard work worth it!

So, today is Wednesday, and since our theme for Teacher Appreciation is Dr. Seuss, I made them Wacky Wednesday cards!  Just to let them know how much we value them!  And to thank them for keeping learning fun this year for our kids!  I also decorated the teacher's lounge w/ a shoe on the wall and a shoe on the ceiling!


Now, this is a not so great picture, because I actually forgot to take a picture this morning before I dragged everyone to school!  So, this was taken in Olivia's classroom. 
When I was thinking about what I could do, I started reading Wacky Wednesday, and took some ideas!  The girl w/out  legs, I exchanged for no head!  Which this is a perfect use for an MFT WTG!  I used MFT's City Skyline die, cut a building out and adhered it above the grass.  I stamped a shoe from one of the sets, WTG Window Shopping maybe?  And then I die cut giraffes from Lisa Johnson's Circus set, but drew the face and spots.  I drew the manhole, and cut it out.  I glued the giraffe in place, and then black c/s behind it so it looks like he's really popping out of a manhole! 

I even put the card together backwards and upside down!  What fun!  The teachers thought they were cute and funny!  Perfect reaction and exactly what I was hoping for!

To see the door decorations for each teacher, check out my post on the eclectic Paperie blog!

Hope your Wednesday is Wonderfully Wacky!

Monday, April 8, 2013

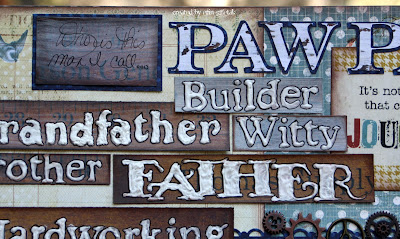
Who Is This Man I Call... Paw Paw - Swirlydoos Round Robin Challenge - April

Hi there!  Today I would like to share w/ you a page that I created for the Swirlydoos Round Robin Challenge for April!  I'm up first for my team this month!  That's a tough spot to be in!  My page doesn't have a traditional layout, so I wish everyone luck, and I'm sorry to be so difficult!!  When you get hit with an idea, you just have to run with it!....

We went on a family vacation in 2011 and my grandparents came along.  For some reason, I was pushed to take pictures of my grandparents one day when we were hanging out by the water's edge.  We LOVE to go to Myrtle Beach, so what a fun vacation we had!  I didn't take too many pics of our whole family, but I did take a few w/ my grandparents as the main subject! 
The following February, my grandfather, whom we call Paw Paw {(pronounced Popaw, saying it kind of fast).  My husband still can't say it right!  I tease him (and correct him) all the time!  :D } suffered a stroke in his sleep.  It's not the kind where if you catch it in time, you can right it, and everything will kind of go back to normal.  This was a bad one that has left him paralyzed on his Left side.  He is home w/ my grandmother being the primary caretaker, with nurses who come and help her twice a day.  It's been a L...O....N....G.... year.  And he will unfortunately never be the same.  He can't joke like he used to do, he can't tease, he can't tell stories.  He's a shell of his former power house self.  We always loved when Grandma and PawPaw would come and visit for a week.  They live in WV.  My mom always had a list a mile long of things that needed fixed in and around our house that only PawPaw could do.  Not that my dad isn't handy, but when it comes to things like hanging ceiling fans or electrical, and pretty much anything carpentry related, my Paw Paw was our go-to guy!  He built my sister and I a play house when we lived in SC, and then when we moved back to PA, he dis-assembled it and re-built it in our new backyard!  He is amazing!  And we love him dearly!  It's so sad to see him cut down like this, spending his days in his bed because he can't do anything else.  He can't drive, or take my grandmother to town.  And my grandmother has had to step up and take care of everything.  She had to teach herself to drive into town, how to drive their van period!, even how to pump gas!  She is also amazing for stepping up and taking on this task of caring for her husband.  What amazing role models they are!


The challenge was to use stencils, gesso, texture paste, glass bead gel, or anything texturized that we would have on hand!  Well, I had everything except glass bead gel, which I found before my page was done, so I quickly added that in there too! 

For the stencils, I used my long forgotten alphabet stencils!  I used several different fonts to create the effect I was looking for.  Each piece of paper w/ a word on it is actually part of a ruler (paper).  One of the 12x12 papers that I have been hoarding were rulers all lined up!  I cut them all out, painted watered down white gesso so you could see through to the ruler, but would white it out a bit so that the words would stand out.  Some are darker or lighter, depending on how it was painted.

Then, I took a pencil and my stencils and drew each word that I thought described my grandfather best.  Now the fun part!  With the help of a baker friend, I purchased disposable icing bags (genius!  Thank you Dawn!!!!), and with my icing tips, I filled in each letter with modeling paste!  It's kind of the consistency of icing, but a bit stiffer.  So, I had to go over the letters a few times, as it was kind of inflexible to spread throughout the letters.  Plus, this is the first time that I have ever done this, so this is my novice move!  Next time it will be more fluid!

After I filled in each letter, I thought the words were boring.  So, I used my Faber-Castell Pitt artist pen to outline each letter (and to hide the pencil lines!) and that really made the words stand out!

Here are some close ups so you can see what I did.  It only took me a few hours to do the whole page, with only 1 quick trip to Michael's!  Haha!

This is the  top of the page:


And the bottom of the page:


Here are some more close ups of the stencils and modeling paste...


Here are the ingredients that I used:
Paper: Kaisercraft Sweet Nothings Collection: Cupids Arrow & Devoted; Bo Bunny Market Rulers;
           Bo Bunny Dark Denim Dot  *I used paper from Swirlydoos previous kits: Antiquities (6/2012) &
           Bonjour Mon Doux (2, 2012)

Embellishments:  white gesso; modeling paste; Faber-Castell Pitt artist pen Black 199; assorted alphabet
                          stencils (most from The Crafter's Workshop); Bo Bunny Weekend Market Trinkets;
                          Tim Holtz gears; Glass Bead Gel (love this stuff!) (used on clocks in middle Right page);
                          Prima Decorative Wood Embellishments (clocks); Simple Stories Destinations Flash
                          Cards; SU! Border Punch (Open Scallop?) (around large picture of PawPaw);  cricut;
                          Baker's decorating bag & tip.


Thanks for letting me share my amazing grandparents! 
Have a wonderful day!

Thursday, April 4, 2013

What do you do with a boring clock?

Hi there!  Today I am the hostess at eclectic Paperie!  We are altering things today! 


Head on over the the eP blog to see how I transformed this clock!

Saturday, March 30, 2013

Me at 33


Hi there! Today I would like to share with you a scrapbook page that I made for Swirlydoos!  The challenge was to create a scrapbook page of yourself!   Do you know how hard that is??!!!!  We had to make it monochromatic and we had to list our age in some way.  We also had to use black gesso or modeling paste w/ a stencil.  I used black gesso w/ a stencil.  Does that count?!  I actually did 2 on 1 stenciling!  I'll explain in a bit!

The pictures of me that I chose are from when we visited my grandparents last summer.  We actually made a complete circle in our travels!  We specifically planned it that way.  My grandfather suffered a stroke last February, and when we were visiting, he was in a nursing home.  Since that time, he has been moved to his home, where my grandmother and 2 wonderful caretakers take care of his every need.  Unfortunately, we haven't had a chance to go back down to visit.  Hopefully we can do that soon!  I miss him!  And my grandmother!

Here's my layout in its entirety:


 Below is the top half of my page, a closer up view, so to speak.  To first create the page, I printed and cut out my pictures.  I distressed them, and then layered them onto black c/s.  I took the piece of wood paper and distressed and sponged w/ black ink and laid out my pictures.  That's as far as I got at my scrapbooking weekend away!  I didn't have the net ribbon w/ me, nor the stamps, the gesso, the stencils, etc.....

This past week, I worked on this page, among the running I had to do all week!  I would paint, and then run to school.  Paint some more, then run to art lessons, and a different school!  Finally, this evening, I was able to sit down and FINISH the page!!!!!  Another scrapbook page DONE!  Whooo hooo!  :D

To create the background page, I started off w/ a Graphic 45 piece of paper and did a whitewash on it using white gesso and a bit of water to thin it out, so that the pattern would show through.  Then, I took my 11" x 14" plastic canvas (usually used for sewing projects!), and taped a swirly stencil on top of it.  I took a paint brush and black gesso and painted through it to create that speckled, almost cross stitch like pattern.  

Then, I die cut flowers from the Tattered Florals Die from Tim Holtz, and I used the negative to sponge some color onto the white washed background.  I used Vintage Photo ink.  Then I took Memento Black ink and sponged around the edges to make it look a bit more 3-D.


Below is the bottom half.  The Tattered Floral flower that I created is actually all white cardstock.  I laid it on
my spray board, and placed the plastic canvas over all of the flowers and sprayed Black/Gray Smooch Spray.  This creates the speckled look that matches my background.  I sponged the edges and put the flower together.  It's pinned together w/ a sparkly brad.  The other flowers are from SU!.  I sprayed them w/ Black/Gray Smooch Spray, and then spot sponged them w/ Memento Black ink.

I adhered black Petaloo flowers, floral sticks, and vintage metal findings, along w/ Black Prima Crystal sheets which are cut.  I only used the black ones...


To create the No. 33, I stamped it w/ Black StazOn onto acetate. 


Can you see the baubles peeking around the gray flowers?  That's actually a necklace!  I bought it at
Forever 21, and the day that I decided to wear it, the darn thing broke!  Well, I am my grandfather's 
granddaughter after all!  I didn't throw it away!  I knew I could use it for SOMETHING!  I stashed it away
with my other metal findings to use at a later date!
Lesson learned:  Don't throw jewelry away!  You can use it on your scrapbook pages!!!


Here's my ingredient list:

Paper: Graphic 45; Black, white c/s
Ink: Vintage Photo Distress Ink; Black StazOn; Memento Black; Black Smooch Spray; White Gesso;
       Black Gesso;
Stamps: Recollections Big One Double; Fiskars Punctuations
Embellishments: sewing machine; Prima Crystal Sheets (Vintage Chic Kit); floral sticks; SU! white flowers;
                        assorted rhinestone brads; metal findings (Vintage Chic Kit); black Petaloo flowers (past
                        Swirlydoos kit); acetate; black net ribbon (past Swirlydoos kit); Swirly stencil (The Crafter's
                        Workshop); plastic canvas; Black Smooch Spray; Tattered Floral die (Tim Holtz);
                         Forever 21 necklace

Have a great day!

Friday, March 22, 2013

eTeam Pick: Corregated Paper!


 Welcome to the March eTeam Picks challenge. The eTeam Picks Challenge is all about inspiration and having fun! During each challenge one of the eTeam members will share a topic, word, technique, sketch, or product that will become the foundation for your creation. This challenge is all about mixing it up and just enjoying the creative process... anything goes! We want to see your work and hear about your inspiration. All of those who play along with our challenge will be entered into a prize drawing for a $15.00 gift certificate to the eclectic Paperie store. Our host this month is the lovely Bonnie Irvine! I'd like you to add something corrugated to your project, whether it's corrugated cardstock or cardboard from a box...whatever and however you want to get it in there.

This week we celebrated my husband's birthday.  He already purchased his own birthday gift, so all I had to do was make him a card, and I couldn't even do that on time!!!  My poor hubby!  Well, I finally finished his card and will give it to him when he comes home from work!

Here's the front.  I used pieces of corregated cardboard for the challenge.  I peeled off the covering to show the mountains and valleys that IS corregation.  I applied some gesso, and sprayed it with Gold Lame` spray and sponged Onyx Black ink all around it and over some of the mountains.  I tore and distressed some paper for different layers.  Added a pocket watch to the top w/ some fussy cutting w/ my exacto knife.
I added some game spinners or clock works from Tim Holtz, and stamped the alarm clock from his Mini Blueprints 4.


 This is the inside.  I decided to continue the corregated cardboard inside, so I made that my journaling area.  I only peeled off the corners and distressed it just like the one on the outside.  I wrote my message on there, and attached everything to the inside.  I stamped Tim's clocks on tissue paper again, and fussy cut a clock for the bottom corner.  I distressed the polka dot paper, and I was done!


Here are the ingredients for my card:
Paper:  Bo Bunny 12" Timepiece; Basic Grey Basics Docket; Prima Printery Coll. Pressman and Page Four;
           black c/s; corregated cardboard; tissue paper
Stamps: Mini Blueprints 4
Embellishments: white gesso, Gold Lame` spray by Heidi Swapp; burlap from Swirlydoos; game spinners &
                         gears from Tim Holtz; Onyx Black ink

Have a wonderful weekend!