Thursday, May 29, 2008

Disney World....Or Bust!!!


Today's card was done for the Ways to Use It Challenge on SCS. We had to do a vacation/packing/travel theme. I have been wanting to use my Travel Time set recently because I unearthed it when looking for something else in the "T" binder. So, this was the perfect opportunity! I started out just stamping the kids. Then, I remembered that I had "the princess castle" that I bought when I was buying Cinderella and Snow White at Michael's. So, I pulled that out, and then the card just kind of came together. I stamped the castle on Basic Gray so I didn't have to color it in. I added a draw bridge that I really did draw. (Pun intended....haha). Then, I drew some clouds to mask so I could sponge blue to make the cloudy sky. And added flowers w/ Water Color Mini's. I just rubbed the sponge back and forth for the grass in Garden Green. Then, I cut out a piece of the grass, and added Bashful Blue paper behind. I drew little swirls in the water w/ a Souffle gel pen. Then, put on Crystal Effects w/ my finger to make it look like water.

For more details, just look me up on SCS: Stampin'NPA

Thanks for stopping by the Magic Kingdom!
Happy Stamping!!!

Wednesday, May 28, 2008

Coffee anyone?


Today's challenge was a sketch challenge and I paired it with the color challenge from yesterday, since I still had the paper out. It was just easier that way! I took out Like It a Latte, which I haven't used in FOREVER and used my swirls cuttlebug folder to create the card. Very little stamping was involved, so this is a very simple easy card! And the challenge was very simple as well.

I used Choc. Chip, Sage Shadow, and Very Vanilla cardstock, and Vellum. I put the Choc. Chip paper through the cuttlebug. Then, I stamped my coffee cup onto V.V. paper and cut it out. Then, I stamped the steam swirls from Treat Yourself onto the vellum and heat embossed w/ clear e.p. I adhered to the back of the coffee cup and then popped the cup up w/ pop up dots. I made my squares to go behind the cup, and then sponged the long piece behind the squares. I was going to stamp coffee beans on the long piece, but thought the coffee beans would add a nicer touch. The top was boring, and I didn't want to do ribbon, so I pulled ou my hodgepodge hardware, and it really is hodgepodge because ALL of my hardware is in there! Not just from SU! I pulled out an "S" clip and attached it. Finished!

Thanks for stopping by for a cup of coffee!
Please come again!
Happy Stamping!!!

Monday, May 26, 2008

Chocolate Shadow friendship gift bag


Today's project was done for the Color Challenge of the day on Splitcoast. We had to use Choc. Chip, Sage Shadow and Very Vanilla. Very nice elegant combo. When I think of these colors together, I think wedding. However, I'm not in a wedding kind of mood today, so I made a bag to give to someone instead. These days I don't have much inspiration or motivation! I have too many things going on!


So, I decided to use My Favorite Things Can Ya Dig It? and By the Seashore. I used the words from these two sets and the flower and pot from the first set mentioned. I just layered the choc. and the sage on top of the vanilla, which I used as a base. I used the scallop punch for the choc. and then punched it in vanilla. Before I put them together, I punched little holes in each scallop and then attached the vanilla behind so it's vanilla dots instead of stark white dots. Thought that was an innovative way of keeping w/ the color scheme. Then, I couldn't find the right sentiment, which is often my problem, so I end up mixing and matching words from different sets together to create the perfect sentiment. And this is what I did here. I used the 1 3/8 circle punch and the 1 1/4 circle punch for the sentiment. I sponged all the sage to add some definition and detail. Then added ribbon to complete the look. The bag is a cellophane bag from Michael's.


The candles are New Leaf and Aloe from PartyLite.


Thanks for stopping by!

Happy Stamping!!!

A Star Studded Birthday!


This weekend we celebrated my dad's birthday! It was a surprise, and we pulled it off! Woo hoo!!!
Since my dad is military, we do a lot of red white and blue. We decided to continue the theme for his birthday. My mom and I made these cute little favors to put at each place setting. We only had to make 28. And then my sister and her boyfriend helped fill the bags while I sealed and decorated them w/ the toppers!

We used In the Stars which is a special set from the SU! Mini Catalog for the main image stamped a dozen times in Real Red and Night of Navy. Then, we actually made two different star colors to mix it up a little bit! Half of the stars at Real Red stars cut out w/ a star stencil and then blue and white star paper (unknown) was punched out of the SU! star punch (which I do have to say is smaller than I anticipated. :( ) and then navy blue ribbon behind. The othe stars, which one is shown here, has a Night of Navy star, red and white star paper from an old paper pack, and red ribbon behind.
Since we went w/ the star theme, I felt like I should carry it on for his b-day card. And what a coincidence, we had to make a masculine card for one of the challenges this week! So, I cut out a star, and folded part of it down to make the card part. I cut out the top point so that it remained a star! I popped up the next layer Real Red, which this star is eyeballed, because I don't have a star inside a star inside a star..... stencil. Then, I embossed another stamp from In the Stars w/ versamark, and then adhered on top of the ribbon.


Thanks for stopping by!
Please come back again!
Happy Stamping...In the land of the free, and the home of the brave!
Happy Memorial Day!

Thursday, May 22, 2008

My "I Want It" Journal

This journal was made last fall for my Michael's board to showcase my 'talent'. I never used it. When I recently reorganized my stamping room I came across it, and decided that I could write my lists of things that I wanted from SU!, My Favorite Things, items at Michael's, and so on.


I don't remember what paper this is from SU!, and obviously it's retired. The letters are chipboard and I stenciled directly on them. I colored around the edges w/ a silver gel pen. I covered them in Crystal Effects and Dazzling Diamonds.

Thanks for stopping!
Happy Stamping!!!

A Teacher Gift


Well, this is my first of many teacher gifts! I think it turned out well! What do you think?


I was cleaning the kitchen last night and was giving my daughter Cheerio's. Well....she threw them all on the floor, so this bottle was empty. I looked at it and thought about how I could use this. I knew that I needed a gift for my son's teacher, and Staples didn't have the clear canisters that I wanted, so this would have to be my container!
I put tissue paper inside and then stuck a bunch of New Leaf and Aloe PartyLite tealights in there. I got my SU! Sale-a-Bration rub-ons out and rubbed some flowers on there to decorate the bottle because stamping on something like that is totally out of the question! Rub-ons were hard enough to do! Then, I just decorated the top and did some more rub-on's.

The card that I made doesn't really go w/ the gift, but oh well. I was looking through my SU! d.p. and found the front and back of a piece that I really liked. I cut the paper so that it went over the card and then folded back and adhered w/ brads. After I cut it first w/ decorative scissors! And I had to pull out my Garden Silhouettes! I LOVE this set! Can you tell??? I use this ALL the time!!!

Anyway, I colored the stamp w/ Regal Rose and Certainly Celery. I sponged Regal Rose around the edges and backed it w/ Certainly Celery and popped it up w/ pop up dots. The ribbon that doesn't really match is from Michael's. I thought I had Certainly Celery ribbon, but I must have used it all! Oh well, I'll have to buy more!!!

Thanks for looking!
Happy Stamping!!!

Wednesday, May 21, 2008

Cinderella - Good or Bad?!


This card was done for a Dirty Swaps that I am involved in on Splitcoaststampers. After doing a little research to see the type of card needed for this, I got to thinking about how I can best convey a dirty card. I had purchased Twisted Sentiments from My Favorite Things when it was first released, but really had not put it to use properly until now! And I bought my daughter Cinderella and Snow White stamps complete w/ a castle stamp from Michael's a few weeks ago just because I had to have them! And she's a princess freak, so I had to get them for her!
So, anyway, I know this card is dirty, but that's the point! It's actually kind of refreshing to have something TOTALLY different than my normal sweet and nice cards on here!

Once I signed up for this swap, I actually had Cinderella out, and I thought it would be perfect to stamp her, and then make a pumpkin coach, and then have horses, like I had seen on another card. So, I was messing around w/ it since I signed up until today! They are finally done! So, I'll be mailing them out this week! Finally!!!!

Thanks for looking!
Happy Stamping!!! Dirty or clean! LOL!

Friday, May 16, 2008

Tart & Tangy Water Bottles


Friday afternoon I decorated some water bottles to give to my friends at our swap that night. I had seen this idea on someone's blog, and decided that I MUST try it, since I have this set, surprise surprise. They turned out SO cute!!!
I used Real Red cardstock for the main hanger. I used SU! D.P. for the label cover. I can't remember what it's called. I used Tempting Turquoise for the scallop circle punches, Handsome Hunter for the 1 3/8 punch behind the strawberry, and Whisper White paper for the strawberry paper behind the kool aid packet and for the main strawberry image. I used the 1 1/4 circle punch for the main strawberry image. I used the 1 3/8 punch for the hole on the top to put the water bottle top through. I used big silver brads to keep the pocket from falling apart.
This was one SUPER easy project! I can't wait to make more!

Thanks for stopping by!
Happy Stamping!!!

Baby gift


This card is one of 8 that I am making for my cousin as part of her baby shower gift. I love to make cards in packs to give to people! These cards are SUPER easy! I'm into the versamark, pearlex powder and blush blossom paper right now.

I wanted to make something simple and elegant yet for a baby! So, this is what I came up w/.

Creative ingredients:
Stamps: I'm Here (thanks Jody K!), Baroque Motifs, All Year Cheer
Paper: Blush Blossom, Very Vanilla
Ink: Versamark
Accessories: Micro Pearl PearlEx powder, ribbon

Thanks for stopping by!
Happy Stamping!!!

Thursday, May 15, 2008

Baby!


Today's card was made for two reasons:

1. I have my cousin's baby shower to go to Sat. and 2. I needed to make a card for today's challenge! We had to use "inchies" which are 1" by 1" squares. Well, I had to be a rebel and stretch the boundaries! I not only did not use a square, I used a 1 1/4" circle punch!!! Oh the creative police are on their way to my house right now!
On the SU! color wheel, Cameo Coral was paired w/ So Saffron and Tempting Turquoise as a complimentary color. I thought those colors would look nice together. I'm not liking the cameo coral though. It looks like salmon. So, I'll put that on my list right up there w/ Taken W/ Teal (for those of you who know how I feel about this color!)

I did a little dot action to liven it up a little bit and some paper piercing. I love to paper pierce! I think it makes anything look pretty! The alphabet is Lovely Letters Alphabet which I am loving! This was the first time I used the set since I got it. This is a beautiful set!!!! I will definitely be using this alpha. a lot! The background is Baroque Motifs. Another favorite of mine! For some of the dots, I used a blue gel pen. I sponged turquoise around the edges because I have to sponge EVERYTHING!

Thanks for stopping by!
Happy Stamping!!!

Tuesday, May 13, 2008

My shopping notebook


Today's challenge was a color challenge. We were to use Soft Sky (an "In color"), Ruby Red, and Pumpkin Pie. So, I ran out of Soft Sky w/ my swaps, so I used Bashful Blue instead. I needed to make something besides a card, because after counting, I need to make 36 cards in the next two weeks!!!! AAAggghhh!!!!! Plus 125 wedding favors!!!! Those will be a piece of cake hopefully...

Anyway, back to the subject!!! So, I started writing in this notebook things that I needed to buy at Michael's, or JoAnne's, wherever I happened to be. And I thought, I should really decorate it, and make it cute, since I'm going to using it for crafts anyway!

The only thing stamped is the red background, which I used my Polka Dot b/g stamp. I just love that thing!!! I used my Scor-Pal on the top blue half, and cut the scallops w/ cheapo Provo Craft scissors. **Hint: Don't buy cheap scissors!!!** I folded each piece of ribbon and stapled it to the red layer. I used a stencil for my name. I screwed up the side, so that's why I have a flower right beside my name! The flowers are chipboard, and I used craft ink to color. I used daubers for the orange in the middle and red on the edges. And that's it!

Thanks for stopping by!
Happy Stamping!!!

Monday, May 12, 2008

Gossip Mongers!


Today's card was done for the Try a New Technique challenge. We had to emboss and then watercolor inside. I really wanted to try my new Punny Farm that I got from MFT a while ago, and thought I would do something w/ Roll, roll roll in the hay which is one of the sentiments from Twisted Sentiments also from MFT. But, then I spied Good Gossip and thought of Charlotte's Web where the two cows were good friends, and thought that would be a perfect card. I remembered that I had paper that was from a pack of paper on clearance at Scrapbook Station, and it's just a field w/ blue skies and a rainbow. Like, how in the heck would I ever use that paper??? Well, I found a use! I have the rest of the sheet as well as another whole sheet! So, if anyone would like to recreate this card, I would be more than happy to share! LOL!


Anyway, I stamped the cows in Black craft ink on watercolor paper. I covered in clear embossing powder (or e.p.) and then took some of my watercolor crayons and colored in the one cow w/ Creamy Caramel and Choc. Chip. The other cow has Close to Cocoa spots. I cut the tail off and moved it to the other side of her body so it wasn't like looking at the same cow twice.


For the cloud, all I did was draw the cloud w/ a silver gel pen. Then I stamped Good Gossip in Night of Navy craft ink and then cover w/ clear e.p. on watercolor paper. I took Bashful Blue crayon and colored the outer edges of the cloud. I took my aquapainter and filled it in and made it look light and airy. I popped the girls and the cloud up on pop up dots.


Thanks for stopping!

Happy Stamping!!!

Sunday, May 11, 2008

A VERY late Mother's Day gift!
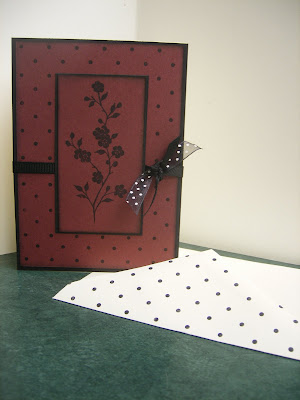
As I said in my last post, my sister is my son's Godmother, and I waited until the last minute to buy her a cool gift. So, I had to make something. I asked her what I could make her, and she said birthday cards. Well, I didn't have time to make 10 different b-day cards. So, I sat there at 11:30 last night browsing through Splitcoast for some spark. I finally got the spark after I shut my computer down and was looking through my paper. I have a ton of Bravo Burgundy paper from past Christmas cards, so I thought that that would be pretty paired w/ black. And I grabbed Garden Silhouettes, which is one of my alltime favorites, and my Polka Dot background stamp, another favorite backgrounder, and came up w/ this. I even stamped the back of the envelope to tie the card and envelope together. It only took 2 1/2 hours to make 10 of these. Assembly line baby!!!


Yesterday, I made my mom her Mother's Day gift. She has a lot of scrapbooking supplies and has more stuff than I have, which is pretty unbelievable, as I have a lot of stuff! So, what to get her???? Well, I spied a canister that I haven't found a use for yet, and thought about decorating it. I took a picture from my refrigerator and mounted it on Real Red cardstock. I stuck eyelets in the corners, and then stamped w/ Real Red and Black StazOn using swirls from Priceless. I sponged the edge of the vanilla paper for added effect and tied ribbon to the sides. For the lid, I thought it was boring silver, so I had to dress it up a little. I had just bought red and white Prima flowers at Michael's the other day, and so I took some and put silver brads through to keep them together, and popped them on w/ pop up dots!


Thanks for stopping by!
Happy Stamping!!!

Happy Mother's Day!!!

Saturday, May 10, 2008

Blossoms Abound for Mother's Day!


This card was made for my sister for Mother's Day, as she is my son's godmother. When I was perusing the SU! catalog the other day, I remembered this card for Blossoms Abound. I love this set! I changed the card a little bit to suit my own purposes and the supplies that I had.

I used Lavender Lace, Certainly Celery and Very Vanilla. This is a two step stamp set, so that's how I have two different looks for the same stamp. I used dots from Polka Dots and Paisley for the celery w/ the ribbon. I used my new Nestibilities for the sentiment and layers. As for the Nestibilities, you can use them in your Cuttlebug! Nice easy way to cut your layers!


Thanks for stopping by!
Happy Stamping!!!

Thursday, May 8, 2008

No Stamping!

Today's card on Splitcoast was to make a card without using any stamps! It's for the Limited Supplies challenge! Hmmmm.....I had to think about this one! I was at Michael's yesterday and bought a couple paper stacks (they WERE on sale), and some other things, so I thought I would use some paper out of one of my stacks. So, I found some coordinating paper and got to work! The last time that I was in Greensburg, I went to this one store, Art Tech, and bought this kit that had rub-ons and you could apply glitter, foil or flocking (they came in sheets). So, I finally brought them out! I love that flocking! It's like carpet on there! Or felt, or something fuzzy! It's SUPER cool!!!! I can't wait to get more! PS: Speaking of felt, one of the other paper stacks I bought has paper in there that has felt on it! How cool is that?!!!


Anyway, so I applied all the stuff and cut my paper out. Then, I added Certainly Celery ribbon, some Prima flowers, which I'm quickly falling in love with! And wha la! It's done!

What do you think?


Thanks for stopping by!
Happy Stamping!!!

Elegant Mother's Day

Today I made a card for my daughter's Godmother to send to her for Mother's Day. I needed something quick and easy and didn't have a lot of layers and stuff. So, I scanned the SU! catalog for some ideas and found Soft Sky and Choc. Chip and thought it looked beautiful! I wanted to use Baroque Motifs for this, I just LOVE this swirly designed stamp! I think I use this ALL THE TIME! I saw on Sharon Johnson's blog where she stamped a swirly design from Flourishes w/ Versamark and then used a stipple brush and applied Pearlex Powder. Well, I have not used my Pearlex powders in a long time, so I thought this was a perfect excuse to start! I made a couple cards a few weeks ago using this and thought I would use that same technique for this card! I wanted to do a nice little box to stamp Happy Mother's Day inside for the middle of the card, but my Happy Mother's Day stamp from All Year Cheer is LARGE so I started playing around w/ my new oval Nestibilities and do a layer to finish the look. I loved how it turned out! What do you think?

Thanks for stopping by!

Happy Stamping!!!

Mary, Mary Quite Contrary. How does your garden grow?

This card was done for yesterday's sketch challenge. I just recently purchased Can Ya' Dig It from My Favorite Things and have wanted to ink it up, but haven't had the opportunity. So, yesterday I did! I wasn't sure where I was going with it, as usual since I never know how it's going to end up! But, I was determined to stay true to the sketch and make something w/ this set! Here it is!


Recipe:

Stamps: Can Ya' Dig It? (MFT), Swiss Dots bg (SU!), Linen bg for gloves and hat texture

Paper: Ruby Red, Me & My Big Ideas, Brocade Blue, Summer Sun, So Saffron, Choc. Chip, white

Ink: Ruby Red, Basic Brown, Basic Black, Regal Rose, Glorious Green, Versamark, silver gel pen, green gel pen, Sahara Sands for the linen bg stamp, Brocade Blue, Summer Sun

Accessories: Pearlex Powder, 1 3/8 circle punch, 1 1/4 circle punch, circle nestibilities by Spellbinders, sponge. I did a little paper piecing for the hat and dress. I used decorative scissors for the dirt that she's sitting on.

Happy Stamping!!!

Tuesday, May 6, 2008

Very basic Lovely Lilac

Today's card was done for the color challenge Lovely Lilac, Certainly Celery, and Pretty in Pink. I didn't have a lot of Pretty in Pink, because I used most of it trying to make an envelope for a card. Sometimes, I just amaze myself w/ how dumb I am when I'm in a rush to complete something!

Anyway, back to the point. I only had like 15 minutes to make this card because I didn't want to be stamping while the kids were sleeping in the same room. So, I had to hurry!!! So, this is what happens when you hurry.


Recipe:
Stamps: Garden Silhouettes, All Year Cheer
Paper: Lovely Lilac, Certainly Celery, Pretty in Pink
Ink: Versamark for the dots (pen), and flowers (pad), Pretty in Pink for the sentiment, Certainly Celery, Lovely Lilac
Accessories: Pearlex Powders, sponge, pop up dots, ribbon

Thanks for stopping by!
Happy Stamping!!!

Monday, May 5, 2008

Fish out of Water

Today's card was to make a diorama for Try a New Technique on Splitcoast. So, I decided, what the heck, I might as well try it and see what happens! I have made some w/ Heather at her workshop and a couple SU! parties, so I was familiar w/ these. But I never tried to make one on my own. Well, today's as good a day as any to try something new! To actually Try a New Technique!

Recipe:
Stamps: All stamps from Artful Inkables (online)

Paper: Brocade Blue, Mellow Moss, watercolor paper

Ink: StazOn black, Really Rust, Always Artichoke, Brocade Blue, Summer Sun

Accessories: aquapainter, pop up dots, blue stickles for the water around the fish, silver gel pen for cloud, sponge, sticky strip, Scor-Pal, 1 3/8 circle punch, 1 1/4 circle punch, white craft ink, clear e.p.


Thanks for stopping by!
Happy Stamping!!!